Category Archives: Ruby on Rails

How to deploy a Ruby on Rails application to AWS Elastic Beanstalk

Overview

This tutorial will show you how to deploy a Rails application to AWS Elastic Beanstalk.

Using Elastic Beanstalk is just one of many (perhaps an infinite number of!) AWS deployment options. Each approach has different pros and cons. I’ll briefly go over some of them because it’s good to understand the pros and cons of various approaches (at least to an extent) before choosing one.

Manual EC2 deployment

One option is to do things “the old fashioned way” and manually set up a Rails application on a single EC2 instance. This is the approach I go over in this AWS/Rails deployment post and it’s perfectly fine for hobby projects where the stakes are low.

The downside to manual EC2 deployment is you end up with a snowflake server, a server with a one-of-a-kind configuration that’s hard to understand, modify, or replicate.

Elastic Beanstalk

Elastic Beanstalk is kind of analogous to Heroku. The basic idea is the same in that both Elastic Beanstalk and Heroku are abstraction layers on top of AWS services. The big difference is that Heroku is generally really easy and Elastic Beanstalk is a giant pain in the ass.

But the upside is that EB provides more easily replicable and understandable server instances than a manual EC2 instance. The server configuration is expressed in files, and then that configuration can be applied to an indefinite number of servers. This makes scaling easier. It’s also nice to know that if I somehow accidentally blow away one of my EC2 instances, EB will just automatically spin up a new identical one for me.

Another drawback to EB is that I understand EB can be kind of overly rigid. I ran into this trouble myself on a project where I needed to set up Sidekiq. I discovered that EB boxed me in in a way that made Sidekiq setup very difficult. So for a production project that grows over time, EB is perhaps a good place to start, but it should be expected that you might want to migrate to something more flexible sometime in the future.

An infrastructure-as-code approach

An infrastructure-as-code approach is probably the best long-term solution, although it currently also seems to be the most difficult and time-consuming to set up initially.

Options in this area include Ansible, Chef, Puppet, ECS, and probably a lot more. I’ve personally only used Ansible. I found Ansible to be great. This post will of course only cover Elastic Beanstalk though.

Configuration steps

Here are the steps we’ll be carrying out in this tutorial.

  1. Install the Elastic Beanstalk CLI
  2. Create the Elastic Beanstalk application
  3. Create the Elastic Beanstalk environment
  4. Create the RDS instance
  5. Deploy

Let’s get started.

Install the Elastic Beanstalk CLI

Much of what we’ll be doing involves the Elastic Beanstalk CLI (command-line interface). It can be installed with this command:

$ brew update && brew install awsebcli

Create the Elastic Beanstalk application

Now cd into the directory that contains your Rails project and run eb init.

$ eb init

When prompted, Select Create new Application. Accept the defaults for all other options.

When this command finishes running you’ll end up with a file called .elasticbeanstalk/config.yml that looks something like this:

branch-defaults:
  master:
    environment: null
    group_suffix: null
global:
  application_name: discuss_with
  branch: null
  default_ec2_keyname: aws-eb-cwj-post
  default_platform: Ruby 2.6 (Passenger Standalone)
  default_region: us-east-1
  include_git_submodules: true
  instance_profile: null
  platform_name: null
  platform_version: null
  profile: personal
  repository: null
  sc: git
  workspace_type: Application

Now that we’ve created our Elastic Beanstalk application, we’ll need to create an Elastic Beanstalk environment inside of that application. I typically set up one production environment and one staging environment inside a single application.

Create the Elastic Beanstalk environment

The command to create an environment is eb create.

$ eb create

You’ll be prompted for what to call your environment. I called mine discuss-with-production.

For load balancer type, choose application.

This step will take a long time. When it finishes, health will probably be “Severe”. Ignore this.

Set up SECRET_KEY_BASE

We’ll need to set a value for the SECRET_KEY_BASE environment variable. This can be done using the following eb setenv command which just sets the variable to a random string.

$ eb setenv SECRET_KEY_BASE=$(ruby -e "require 'securerandom';puts SecureRandom.hex(64)")

Set up ebextensions

With Elastic Beanstalk, you can add files in an .ebextensions directory at your project root to control how your server is configured. We need to add three ebextensions files.

The first, .ebextensions/01_ruby.config, looks like this:

packages:
  yum:
    git: []

container_commands:
  01_assets:
    command: RAILS_ENV=production bundle exec rake assets:precompile
    leader_only: true

The second, .ebextensions/02_yarn.config, looks like this:

commands:

  01_node_get:
    cwd: /tmp
    command: 'sudo curl --silent --location https://rpm.nodesource.com/setup_13.x | sudo bash -'

  02_node_install:
    cwd: /tmp
    command: 'sudo yum -y install nodejs'

  03_yarn_get:
    cwd: /tmp
    # don't run the command if yarn is already installed (file /usr/bin/yarn exists)
    test: '[ ! -f /usr/bin/yarn ] && echo "yarn not installed"'
    command: 'sudo wget https://dl.yarnpkg.com/rpm/yarn.repo -O /etc/yum.repos.d/yarn.repo'

  04_yarn_install:
    cwd: /tmp
    test: '[ ! -f /usr/bin/yarn ] && echo "yarn not installed"'
    command: 'sudo yum -y install yarn'

The last, .ebextensions/gem_install_bundler.config, looks like this:

files:
  "/opt/elasticbeanstalk/hooks/appdeploy/pre/09_gem_install_bundler.sh" :
    mode: "000775"
    owner: root
    group: users
    content: |
      #!/usr/bin/env bash

      EB_APP_STAGING_DIR=$(/opt/elasticbeanstalk/bin/get-config container -k app_staging_dir)
      EB_SCRIPT_DIR=$(/opt/elasticbeanstalk/bin/get-config container -k script_dir)
      # Source the application's Ruby
      . $EB_SCRIPT_DIR/use-app-ruby.sh

      cd $EB_APP_STAGING_DIR
      echo "Installing compatible bundler"
      gem install bundler -v 2.0.2

Deploy the application

Now we can make our first deployment attempt.

$ eb deploy

Unfortunately, it doesn’t work. We get an error that says: /opt/elasticbeanstalk/hooks/appdeploy/pre/12_db_migration.sh failed.

Why does this happen? Because he haven’t set up a database yet. Let’s do that now.

Create the RDS instance

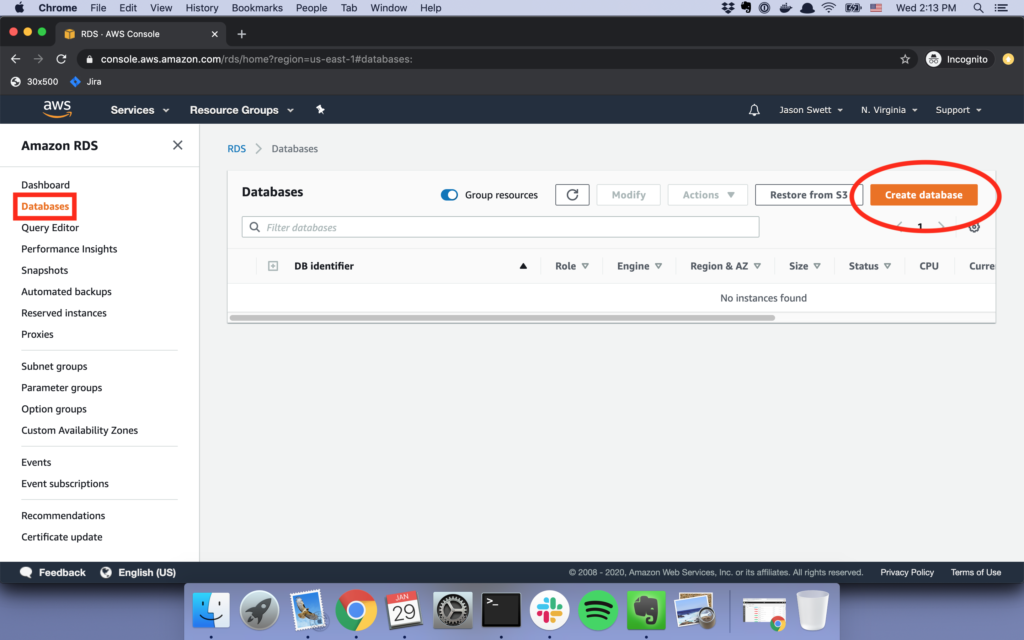
In the AWS console, go to RDS, go to Databases, and click Create database.

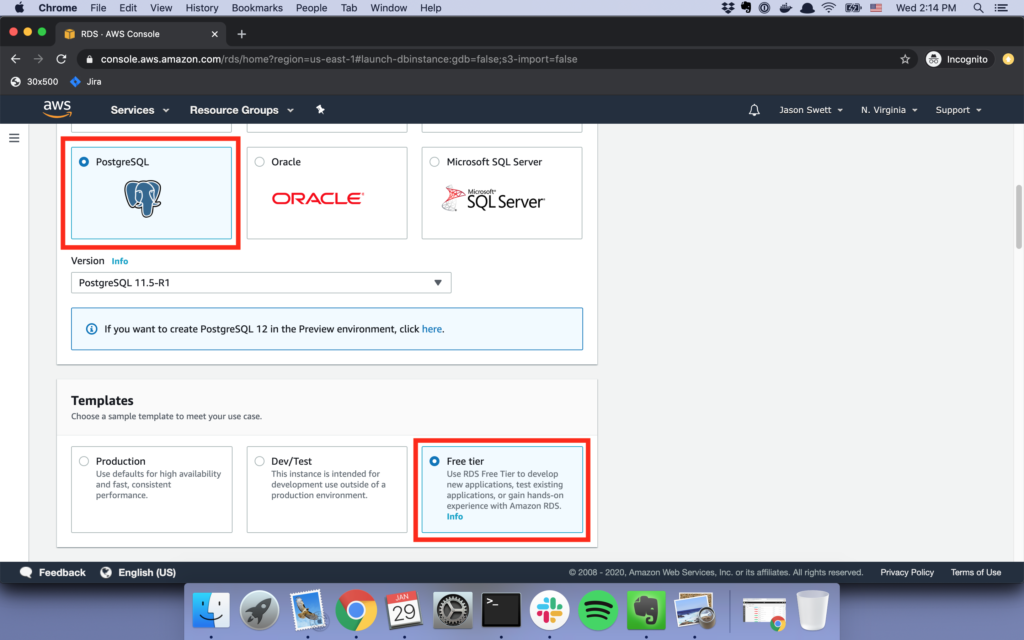
Choose Postgresql and Free tier.

Choose whatever name you like for your database. I’m calling mine discuss-with-production

For size, choose t2.micro.

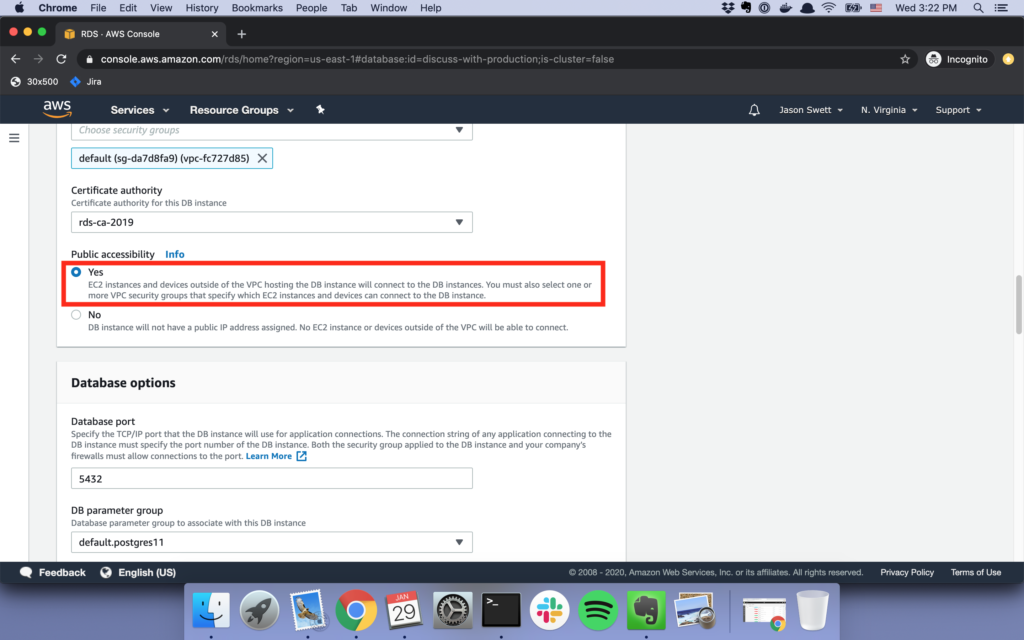
Make sure to set public accessibility to Yes so you can remotely connect to your database from your development machine.

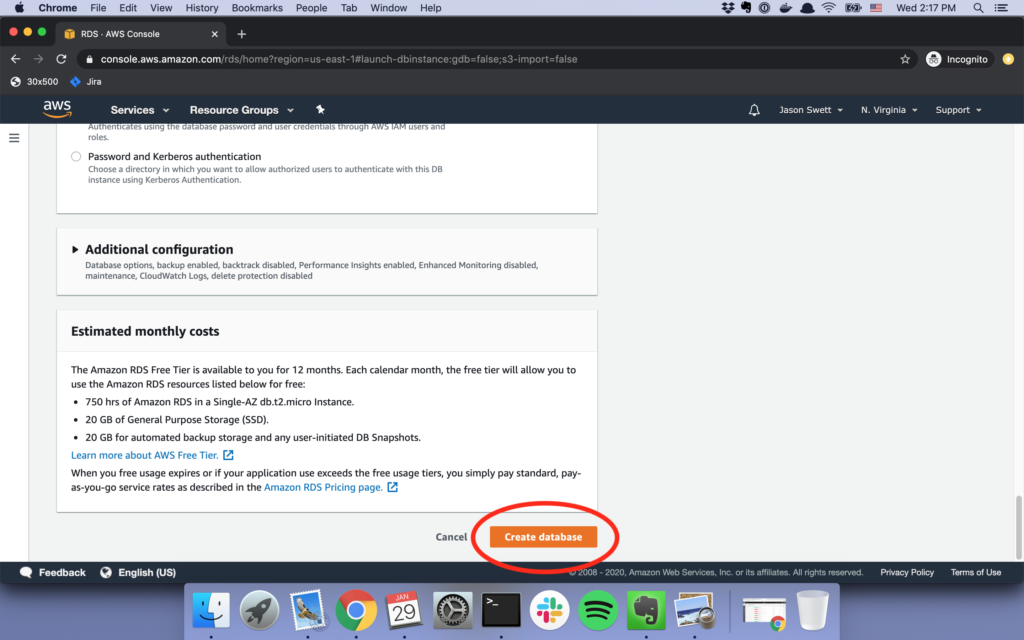
Click Create database.

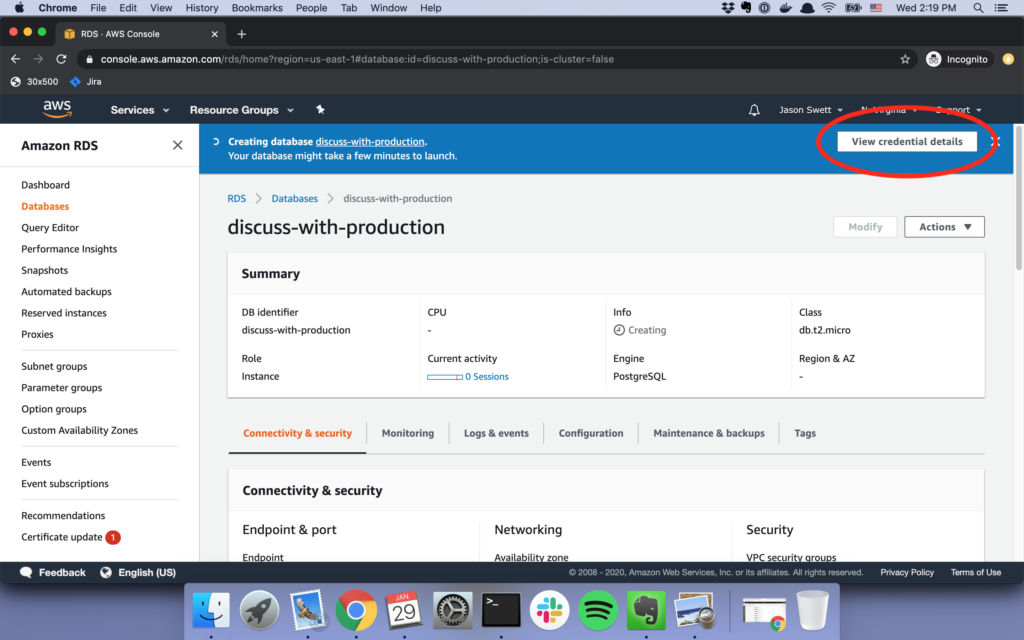
On the next screen, click View credential details.

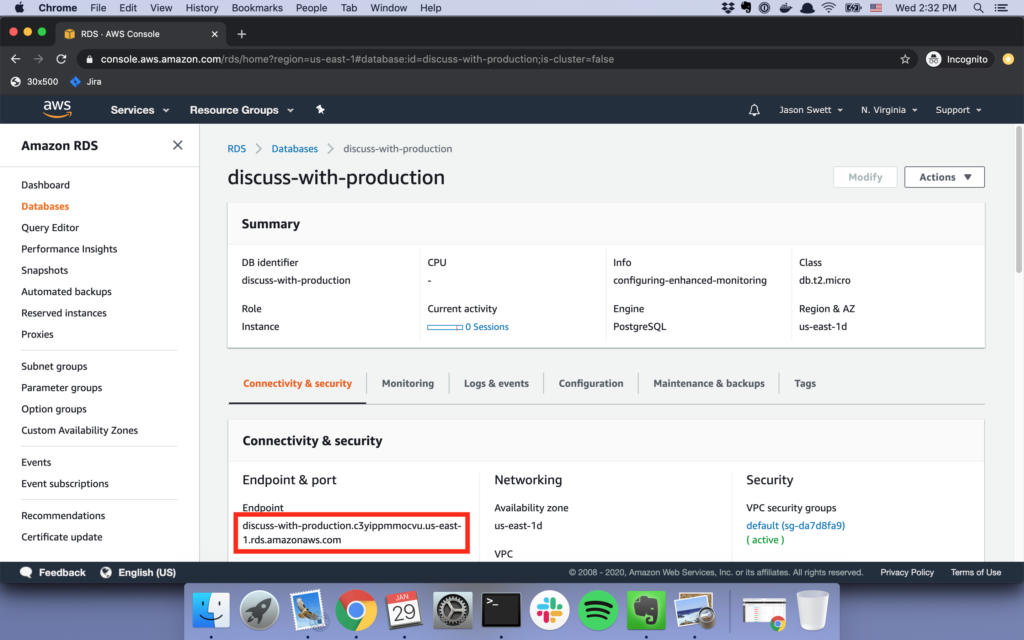
Copy what’s there to a separate place for later use. You’ll also need the RDS instance’s endpoint URL which is found in a different place, under Connectivity & security and then Endpoint & port.

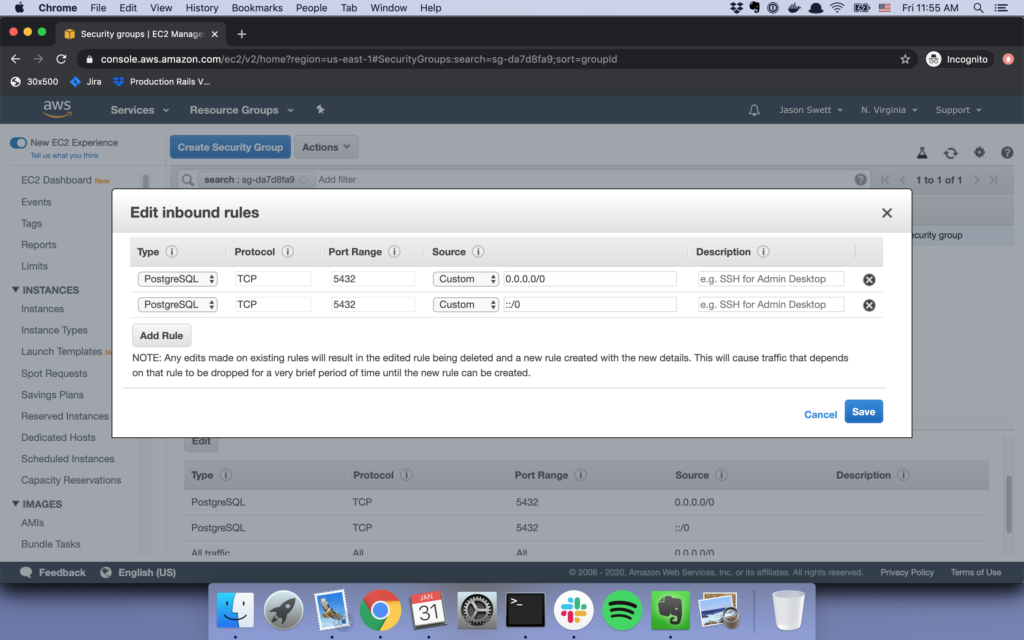
Make sure your database’s security group has port 5432 open.

Set the database credentials and create the database instance

Our production server will need to know the database endpoint URL and database credentials. Run the eb setenv command, with your own values of course replaced for mine, to set these values.

$ eb setenv RDS_DATABASE=discuss-with-production RDS_USERNAME=postgres RDS_PASSWORD=your-password RDS_HOST=your-endpoint-url

Even though the RDS instance exists, our actual PostgreSQL instance doesn’t exist yet. The RDS instance itself is more like just a container. We can run the rails db:create command remotely on the RDS instance by supplying the RDS endpoint URL when we run rails db:create.

Before running this command, make sure the production section of config/database.yml matches up with these environment variable names as follows:

production:
  <<: *default
  database: <%= ENV['RDS_DATABASE'] %>
  username: <%= ENV['RDS_USERNAME'] %>
  password: <%= ENV['RDS_PASSWORD'] %>
  host: <%= ENV['RDS_HOST'] %>
  port: 5432

Now create the database.

$ RDS_DATABASE=discuss-with-production RDS_USERNAME=postgres RDS_PASSWORD=your-password RDS_HOST=your-endpoint-url rails db:create

Deploy the application

Now the application can finally be deployed for real using eb deploy.

$ eb deploy

Once this finishes you can use the eb open command to visit your environment’s URL in the browser.

$ eb open

Where to start with introducing TDD to a new Rails app

A Code With Jason reader recently wrote me with the following question:

How do I introduce TDD into a new Rails app? Where do I start? I am deeply knowledgable on RSpec and use it a lot. I am not sure how to get started with testing in Rails. When should testing be introduced? (hopefully as soon as possible) What should be testing vs. what should I assume works because it was tested in some other way? For example, why test generated code?

There are a lot of good questions here. I’ll pick a couple and address them individually.

How do I introduce TDD into a new Rails app?

This depends on your experience level with Rails and with testing.

I personally happen to be very experienced with both Rails and testing. When I build a new Rails application, I always start writing tests from the very beginning of the project.

If you’re new to Rails AND new to testing, I wouldn’t recommend trying to learn both at the same time. That’s too much to learn at once. Instead, get comfortable with Rails first and then start learning testing.

What if you’re comfortable with Rails but not testing yet? How do you introduce testing to a new Rails app then?

I would suggest starting with testing from the very beginning. Adding tests to your application is never going to be easier than it will be at the very beginning. In fact, retroactively adding tests to an existing application is notoriously super hard.

The kinds of tests to start with

What kinds of tests should you add at the beginning? I would recommend starting with acceptance tests, also known to some as integration tests, end-to-end tests or, in RSpec terminology, feature specs. The reason I recommend starting with feature specs is that they’re conceptually easy to grasp. They’re a simulation of a human opening a browser and clicking on things and typing stuff.

You can start with a feature spec “hello world” where you just visit a static page and verify that it says “hello world”. Once you’re comfortable with that, you can add feature specs to all your CRUD operations. I have a step-by-step formula for writing feature specs that you can use too.

Once you’re somewhat comfortable with feature specs, you can move on to model specs.

Testing vs. TDD

I’ve been sloppy with my language so far. I’ve been talking about testing but the question was specifically about TDD. How do you introduce TDD into a new Rails app?

First let me say that I personally don’t do TDD 100% of the time. I maybe do it 60% of the time.

I mainly write two types of tests in Rails: feature specs and model specs. When I’m building a new feature, I often don’t know exactly what form the UI is going to take or what labels or IDs all the page elements are going to have. This makes it really hard for me to try to write a feature spec before I write any code. So, usually, I don’t bother.

Another reason I don’t always do TDD is that I often use scaffolds, and scaffolds and TDD are incompatible. With TDD you write the tests first and the code after. Since scaffolds give you all the code up front, it’s of course impossible to write the tests before the code because the code already exists.

So again, the only case when I do TDD is when I’m writing model code, and I would guess this is maybe 60% of the time.

How, then, should you start introducing TDD to a new Rails app? I personally start TDD’ing when I start writing my first model code. The model code is often pretty trivial for the first portion of a Rails app’s lifecycle, so it’s usually a while before I get into “serious TDD”.

What should I be testing vs. what should I assume works because it was tested in some other way? For example, why test generated code?

I’ll answer the second part of this question first.

Why test generated code?

I assume when we say “generated code” we’re mainly talking about scaffolding.

If you’re never ever going to modify the generated code there’s little value in writing tests for it. Scaffold-generated CRUD features pretty much always just work.

However, it’s virtually never the case that a scaffolded feature comes out exactly the way we want with no modification required. For anything but the most trivial models, a little tweaking of the scaffold-generated code is necessary in order to get what we need, and each tweak carries a risk of introducing a bug. So it’s not really generated code. Once a human starts messing with it, all bets are off.

That’s not even the main value of writing tests for generated code though. The main value of the tests covering generated code (which, again, is rarely 100% actual generated code) is that the tests help protect against regressions that may be introduced later. If you have tests, you can refactor freely and be reasonably confident that you’re not breaking anything.

Having said that, I don’t try to test all parts of the code generated by a scaffold. There are some things that are pointless to test.

What should I test and what should I assume works?

When I generate a scaffold, there are certain types of tests I put on the scaffold-generated code. I have a step-by-step process I use to write specific test scenarios.

I typically write three feature specs: a feature spec for creating a record using valid inputs, a feature spec for trying to create a record using invalid inputs, and a feature spec for updating a record. That’s enough to give me confidence that things aren’t horribly broken.

At the model level, I’ll typically add tests for validations (I am TDD’ing in this case) and then add the validations. Usually I only need a few presence validations and maybe a uniqueness validation. It’s not common that I’ll need anything fancier than that at that time.

There are certain other types of tests I’ve seen that I think are pointless. These include testing the presence of associations, testing that a model responds to certain methods, testing for the presence of callbacks, and testing for database columns and indexes. There’s no value in testing these things directly. These tests are tautological. What’s better is to write tests for the behaviors that these things (i.e. these associations, methods, etc.) enable.

Suggestions for further reading

Extracting a tidy PORO from a messy Active Record model

Skinny controller, fat model – the old advice

In 2006 Jamis Buck wrote a famous post called Skinny Controller, Fat Model. In it Jamis observed that Rails developers often put too much logic in controllers, making the code harder to understand and to test than it needs to be.

“Skinny controllers, fat models” became a piece of accepted wisdom in the Rails community. It was a step forward in the overall state of affairs, but a problem remained: moving code out of controllers and into models often resulted in fat models.

The new advice: skinny everything

Over time developers apparently came to a realization that while it’s better in certain ways to put bulky code in models than in controllers, the fatness, wherever you put it, is still kind of a problem.

Other ways of combating digital obesity were adopted or devised, including concerns, service objects, domain objects, Interactors, factories, something called Trailblazer, and probably others. These solutions vary in how good they are and where they’re appropriate to use.

Not all weight loss methods are equally good

When we talk about making e.g. a controller less fat, we of course aren’t talking about obliterating the bulk from existence but rather just moving it to a more appropriate place. The world is complex and we can’t make the complexity go away. The art is in distributing the complexity throughout the code such that a human can understand what the application does, in spite of the complexity.

For whatever reason, it seems lately that “service objects” (a term which means different things to different people, hence the quotes) and Interactors are widely esteemed as great ways to reorganize complexity in a Rails application. I personally find Interactors and service objects unappealing. In fact, I think they’re terrible. Avdi Grimm seems to have a similar opinion.

I think service objects and Interactors add unnecessary complexity to an application without adding any meaning to justify their added complexity. To take every action and make an object named after it—e.g. AuthenticateUser, PlaceOrder, SendThankYou—seems like a superfluous, tautological extra step. I think we can do better.

The case for POROs and domain objects

In Domain Driven Design, Eric Evans describes the concept of domain objects, which I take to mean: objects that represent concepts from the domain.

To me this makes a lot of sense. Most Rails applications of course already make use of this concept. If there’s something called an appointment in the domain, there will be an Appointment class in the application. If there’s something called a Patient in the domain, there will be a Patient class in the application.

It’s also possible to invent objects that don’t exist in the domain, that only exist to make the code easier to understand. It took me personally a long time to realize this. Examples of object-oriented programming often include things like creating a Dog and a Cat class, each of which inherit from Animal. These examples seem sensible and straightforward, but think of how many objects in Ruby and Rails have nothing to do with any corresponding real-world idea, e.g. Request, MimeNegotiation and SingularAssociation.

These types of objects take a little extra imagination to conceive of and name, but I think once a person opens up their mind to this way of coding, it gets easier and easier.

The form that I like to give these sorts of objects is POROs (Plain Old Ruby Objects).

My example code: a messy Active Record class

For the remainder of this post I’m going to take a certain big, messy Active Record class and refactor it into some number of POROs.

The code below is taken from a real production application. It was written by a terrible programmer: me in 2012. The class represents a stylist at a hair salon.

I invite you to have a nice scroll through the code and give yourself a light familiarity with it.

class Stylist < ActiveRecord::Base
  include ActionView::Helpers::NumberHelper
  scope :active, -> { where(active: true) }
  scope :inactive, -> { where(active: false) }
  scope :with_active_salon, -> { joins(:salon).merge(Salon.active) }

  scope :non_receptionist, -> {
    joins('LEFT JOIN user_role ON user_role.user_id = stylist.user_id')
    .joins('LEFT JOIN role ON user_role.role_id = role.id')
    .where('role.code != ? OR role.code IS NULL', 'RECEPTIONIST')
  }

  belongs_to :salon
  belongs_to :user
  has_many :roles, through: :user
  belongs_to :stylist_employment_type
  has_many :stylist_services
  has_many :services, through: :stylist_services
  has_many :rent_payments
  has_many :appointments
  has_many :clients, through: :appointments
  attr_accessor :skip_saving_other_stylists

  accepts_nested_attributes_for :user, :allow_destroy => true, :reject_if => :all_blank

  after_initialize -> { self.skip_saving_other_stylists = false }
  before_save -> { make_sure_self_gets_correct_order_index }
  after_save -> { salon.reload.resave_stylists unless skip_saving_other_stylists }

  validates_presence_of :name
  validates_presence_of :salon

  validates_each :name do |model, attr, value|
    stylist = Stylist.find_by_name_and_salon_id(value, model.salon_id)
    if stylist != nil and stylist.id != model.id
      model.errors.add(attr, "A stylist with name \"#{value}\" already exists.")
    end
  end

  def service_length(service)
    ss = stylist_services.find_by_service_id(service.id)
    ss ? ss.length_in_minutes : ""
  end

  def service_price(service)
    ss = stylist_services.find_by_service_id(service.id)
    ss ? ss.price : ""
  end

  def unique_clients_ordered_by_name
    Client.select("client.*, TRIM(UPPER(client.name)) upper_name")
          .joins(:appointments)
          .where("appointment.stylist_id = ?", id)
          .uniq
          .order("upper_name")
  end

  def save_services(lengths, prices)
    stylist_services.destroy_all
    salon.services.active.each_with_index do |service, i|
      if lengths[i].to_i > 0 || prices[i].to_i > 0
        StylistService.create!(
          stylist_id: self.id,
          service_id: service.id,
          length_in_minutes: lengths[i],
          price: prices[i]
        )
      end
    end
  end

  def report(date)
    sql = "
      SELECT a.start_time,
             c.name client_name,
             ti.label item_label,
             CASE WHEN ti.is_taxed = true THEN ti.price * #{salon.tax_rate + 1}
                  ELSE ti.price
             END
        FROM appointment a
        JOIN transaction_item ti ON ti.appointment_id = a.id
        JOIN client c ON a.client_id = c.id
        JOIN stylist s ON a.stylist_id = s.id
       WHERE s.id = #{self.id}
         AND a.start_time >= '#{Date.parse(date).strftime}'
         AND a.start_time <= '#{(Date.parse(date) + 7).strftime}'
    ORDER BY a.start_time,
             c.name,
             ti.label
    "
    result = self.connection.select_all(sql)
    result
  end

  def save_services_for_demo
    [{:name => "Men's Haircut",   :price => 20, :length => 30},
     {:name => "Women's Haircut", :price => 20, :length => 40}].each do |service|
      s = Service.create(
        :name => service[:name],
        :price => service[:price],
        :salon_id => self.salon_id
      )
      StylistService.create(
        :service_id => s.id,
        :stylist_id => self.id,
        :length_in_minutes => service[:length]
      )
    end
  end

  def formatted_rent
    if self.rent > 0
      number_with_precision(self.rent, :precision => 2)
    else
      ""
    end
  end

  def formatted_service_commission_rate
    if self.service_commission_rate > 0
      number_with_precision(self.service_commission_rate, :precision => 2)
    else
      ""
    end
  end

  def formatted_retail_commission_rate
    if self.retail_commission_rate > 0
      number_with_precision(self.retail_commission_rate, :precision => 2)
    else
      ""
    end
  end

  def clean_values
    if self.rent == nil
      self.rent = 0
    end

    if self.service_commission_rate = nil
      self.service_commission_rate = 0
    end

    if self.retail_commission_rate = nil
      self.retail_commission_rate = 0
    end
  end

  def pay_rent(date = Time.zone.now)
    payment = RentPayment.new
    payment.date = date
    payment.stylist_id = self.id
    payment.amount = self.rent
    payment.save
  end

  def rent_payments
    RentPayment.find_all_by_stylist_id(self.id)
  end

  def new_rent_payment
    rp = RentPayment.new
    rp.date = Time.zone.today
    rp.stylist_id = self.id
    rp.amount = self.rent
    rp
  end

  def gross_service_sales(start_date, end_date)
    self.salon.earnings(start_date, end_date, self.id)['services'].to_f
  end

  def net_service_sales(start_date, end_date)
    self.gross_service_sales(start_date, end_date) * self.service_commission_rate
  end

  def gross_product_sales(start_date, end_date)
    self.salon.earnings(start_date, end_date, self.id)['products'].to_f
  end

  def net_product_sales(start_date, end_date)
    self.gross_product_sales(start_date, end_date) * self.retail_commission_rate
  end

  def self.everyone_stylist
    self.new(id: 0, name: 'All Stylists')
  end

  def make_sure_self_gets_correct_order_index
    self.cached_order_index = order_index
    self.manual_order_index = manual_position if salon.has_manual_order?
  end

  def manual_position
    new_record? ? salon.highest_manual_order_index + 1 : manual_order_index
  end

  def alphabetical_position
    stylist_names = salon.ordered_stylist_names
    stylist_names << name unless stylist_names.member? name
    stylist_names.map(&:downcase).sort!.index(name.downcase)
  end

  def order_index
    return -1 unless active
    salon.has_manual_order? ? manual_position : alphabetical_position
  end

  def has_appointment_at?(start_time)
    appointments.where("start_time = ? and is_cancelled = false", start_time).any?
  end

  def stylist_employment_type_code
    stylist_employment_type ? stylist_employment_type.code : ""
  end
end

The PORO to extract: calendar-related code

The class is so big and the code is so bad that it’s hard to decide where to start. I could spend quite a lot of time refactoring this class, but to make it all fit into a reasonable blog post, I’ll extract just one POROs out of this class.

There are a few methods that I happen to know are related to displaying the stylist’s name on the calendar:

def manual_position
  new_record? ? salon.highest_manual_order_index + 1 : manual_order_index
end

def alphabetical_position
  stylist_names = salon.ordered_stylist_names
  stylist_names << name unless stylist_names.member? name
  stylist_names.map(&:downcase).sort!.index(name.downcase)
end

def order_index
  return -1 unless active
  salon.has_manual_order? ? manual_position : alphabetical_position
end

This is relatively easy low-hanging fruit. I can just conceive of a Calendar object and move these methods into it.

class Calendar
  def manual_position
    new_record? ? salon.highest_manual_order_index + 1 : manual_order_index
  end

  def alphabetical_position
    stylist_names = salon.ordered_stylist_names
    stylist_names << name unless stylist_names.member? name
    stylist_names.map(&:downcase).sort!.index(name.downcase)
  end

  def order_index
    return -1 unless active
    salon.has_manual_order? ? manual_position : alphabetical_position
  end
end

This won’t exactly work, though. Many of the values referred to inside this new class only exist in the context of a Stylist. We’ll need to pass in a Stylist instance.

class Calendar
  def initialize(stylist)
    @stylist = stylist
  end

  def manual_position
    @stylist.new_record? ? salon.highest_manual_order_index + 1 : @stylist.manual_order_index
  end

  def alphabetical_position
    stylist_names = salon.ordered_stylist_names
    stylist_names << @stylist.name unless stylist_names.member? @stylist.name
    stylist_names.map(&:downcase).sort!.index(@stylist.name.downcase)
  end

  def order_index
    return -1 unless @stylist.active
    salon.has_manual_order? ? @stylist.manual_position : @stylist.alphabetical_position
  end

  private

  def salon
    @stylist.salon
  end
end

Now that I see this much, I realize I’ve chosen an unfitting name for this class. All this code deals with figuring out where to show the current stylist in a list of all the stylists. There’s no way it makes sense to have a Calendar instance with just one single Stylist inside it. This class name needs to change.

Perhaps CalendarStylistListItem is a better name.

class CalendarStylistListItem
  def initialize(stylist)
    @stylist = stylist
  end

  def manual_position
    @stylist.new_record? ? salon.highest_manual_order_index + 1 : @stylist.manual_order_index
  end

  def alphabetical_position
    stylist_names = salon.ordered_stylist_names
    stylist_names << @stylist.name unless stylist_names.member? @stylist.name
    stylist_names.map(&:downcase).sort!.index(@stylist.name.downcase)
  end

  def order_index
    return -1 unless @stylist.active
    salon.has_manual_order? ? @stylist.manual_position : @stylist.alphabetical_position
  end

  private

  def salon
    @stylist.salon
  end
end

Now I can take a closer look at the contents of this class itself. I’m going to focus on this method first:

def manual_position
  @stylist.new_record? ? salon.highest_manual_order_index + 1 : @stylist.manual_order_index
end

Why is salon concerned with highest_manual_order_index? That seems like too fine-grained a detail for it to care about. That also seems like perhaps a responsibility of the CalendarStylistListItem class. Let’s bring it in.

class CalendarStylistListItem
  def initialize(stylist)
    @stylist = stylist
  end

  def manual_position
    @stylist.new_record? ? highest_manual_order_index + 1 : @stylist.manual_order_index
  end

  def alphabetical_position
    stylist_names = salon.ordered_stylist_names
    stylist_names << @stylist.name unless stylist_names.member? @stylist.name
    stylist_names.map(&:downcase).sort!.index(@stylist.name.downcase)
  end

  def order_index
    return -1 unless @stylist.active
    salon.has_manual_order? ? @stylist.manual_position : @stylist.alphabetical_position
  end

  private

  def highest_manual_order_index
    salon.stylists.map(&:manual_order_index).max
  end

  def salon
    @stylist.salon
  end
end

Now I’ll focus on the next method down, alphabetical_position.

def alphabetical_position
  stylist_names = salon.ordered_stylist_names
  stylist_names << @stylist.name unless stylist_names.member? @stylist.name
  stylist_names.map(&:downcase).sort!.index(@stylist.name.downcase)
end

Some of this code could certainly be refactored to be tidier, but I don’t see a lot with respect to object composition that needs to change. One thing that does stick out to me is salon.ordered_stylist_names. This seems like a concern of the CalendarStylistListItem, not of the salon. Let’s bring this method in.

class CalendarStylistListItem
  def initialize(stylist)
    @stylist = stylist
  end

  def manual_position
    @stylist.new_record? ? highest_manual_order_index + 1 : @stylist.manual_order_index
  end

  def alphabetical_position
    stylist_names = ordered_stylist_names
    stylist_names << @stylist.name unless stylist_names.member? @stylist.name
    stylist_names.map(&:downcase).sort!.index(@stylist.name.downcase)
  end

  def order_index
    return -1 unless @stylist.active
    salon.has_manual_order? ? @stylist.manual_position : @stylist.alphabetical_position
  end

  private

  def highest_manual_order_index
    salon.stylists.map(&:manual_order_index).max
  end

  def ordered_stylist_names
    salon.stylists.active.non_receptionist
      .order(salon.attribute_by_which_to_order_stylists)
      .map(&:name)
  end

  def attribute_by_which_to_order_stylists
    salon.has_manual_order? ? "stylist.manual_order_index" : "LOWER(stylist.name)"
  end

  def salon
    @stylist.salon
  end
end

In the process of doing this I see one more method that’s currently in Salon that would be more appropriate in CalendarStylistListItem: the has_manual_order? method. Let’s bring that in and rename it to salon_has_manual_order?.

class CalendarStylistListItem
  def initialize(stylist)
    @stylist = stylist
  end

  def manual_position
    @stylist.new_record? ? highest_manual_order_index + 1 : @stylist.manual_order_index
  end

  def alphabetical_position
    stylist_names = ordered_stylist_names
    stylist_names << @stylist.name unless stylist_names.member? @stylist.name
    stylist_names.map(&:downcase).sort!.index(@stylist.name.downcase)
  end

  def order_index
    return -1 unless @stylist.active
    salon_has_manual_order? ? @stylist.manual_position : @stylist.alphabetical_position
  end

  private

  def highest_manual_order_index
    salon.stylists.map(&:manual_order_index).max
  end

  def ordered_stylist_names
    salon.stylists.active.non_receptionist
      .order(salon.attribute_by_which_to_order_stylists)
      .map(&:name)
  end

  def attribute_by_which_to_order_stylists
    salon_has_manual_order? ? "stylist.manual_order_index" : "LOWER(stylist.name)"
  end

  def salon_has_manual_order?
    salon.stylists.sum(:manual_order_index) > 0
  end

  def salon
    @stylist.salon
  end
end

Lastly, I’m pretty sure the only method needed from the outside is order_index. Let’s make manual_position and alphabetical_position private.

class CalendarStylistListItem
  def initialize(stylist)
    @stylist = stylist
  end

  def order_index
    return -1 unless @stylist.active
    salon_has_manual_order? ? @stylist.manual_position : @stylist.alphabetical_position
  end

  private

  def manual_position
    @stylist.new_record? ? highest_manual_order_index + 1 : @stylist.manual_order_index
  end

  def alphabetical_position
    stylist_names = ordered_stylist_names
    stylist_names << @stylist.name unless stylist_names.member? @stylist.name
    stylist_names.map(&:downcase).sort!.index(@stylist.name.downcase)
  end

  def highest_manual_order_index
    salon.stylists.map(&:manual_order_index).max
  end

  def ordered_stylist_names
    salon.stylists.active.non_receptionist
      .order(salon.attribute_by_which_to_order_stylists)
      .map(&:name)
  end

  def attribute_by_which_to_order_stylists
    salon_has_manual_order? ? "stylist.manual_order_index" : "LOWER(stylist.name)"
  end

  def salon_has_manual_order?
    salon.stylists.sum(:manual_order_index) > 0
  end

  def salon
    @stylist.salon
  end
end

Making use of the new CalendarStylistListItem class

This tidy new PORO is of course only valuable if we can actually use it. How do we do so?

All the logic inside of CalendarStylistListItem seems to exist for the purpose of figuring out the order_index. Externally, it seems that order_index is the only method on the class that gets called.

And it looks like the one place that order_index gets called is in Stylist#make_sure_self_gets_correct_order_index. Currently, that method looks like this:

class Stylist
  def make_sure_self_gets_correct_order_index
    self.cached_order_index = order_index
    self.manual_order_index = manual_position if salon.has_manual_order?
  end
end

On the line self.cached_order_index = order_index, it’s of course the Stylist class’s own implementation of order_index that’s getting called. It was of course our whole aim in this refactoring exercise to be able to remove methods like order_index from the Stylist class (because, again, the stylist’s order index on the calendar is a detail that’s peripheral to the essence of the Stylist class). So, let’s stop calling Stylist#order_index and start calling CalendarStylistListItem#order_index.

This can be achieved in the following way:

class Stylist
  def make_sure_self_gets_correct_order_index
    self.cached_order_index = CalendarStylistListItem.new(self).order_index
    self.manual_order_index = manual_position if salon.has_manual_order?
  end
end

With that change, the tie is severed, and we can now safely delete the order_index from the Stylist class as well as the following methods that now live inside CalendarStylistListItem:

  • Stylist#manual_position
  • Stylist#alphabetical_position
  • Salon#highest_manual_order_index
  • Salon#has_manual_order?
  • Salon#attribute_by_which_to_order_stylists
  • Salon#ordered_stylist_names

That’s a big improvement! Previously, we had a lot of logic scattered across two classes, adding distractions and possible confusions to both classes. Now all that logic is kept in one single cohesive class.

Conclusion

The process of creating my PORO, CalendarStylistListItem, didn’t require importing any libraries or learning any radically new techniques. All I had to do was identify a “missing abstraction” in my Stylist class and then conceive of a new object to bundle it up in.

The overall impact to the Stylist class was not all that profound, but cleaning up a big messy class is of course going to take quite a lot of work. I feel like this was a meaningful step in a positive direction.

Next time you encounter a bloated Active Record model, I hope that instead of reaching for a service object or Interfactor, you might consider refactoring to a PORO.
My top five Rails performance tips for performance noobs

Performance is a topic that’s widely discussed and also, sadly, widely misunderstood.

I’m going to share five performance tips that have worked well for me in my 9+ years of using Rails and even before that, since much of what’s here is technology-agnostic.

I want to add a caveat: I’ve never worked for a big B2C startup that has needed to scale to millions of users. I’ve worked mostly applications with modest user bases and modest performance requirements. Luckily, I imagine my career experiences are probably pretty similar to that of most Rails developers, so it’s highly likely that what has worked for me performance-wise will also worked for you.

If you already know the basics of performance optimization and want to hear from someone who does Rails performance work all day every day, I recommend checking out the work of my friend Nate Berkopec, who I know as “The Rails Performance Guy”. (I’ve also had Nate on my podcast.)

Now onto my tips.

1. Don’t optimize prematurely

Before I came to Rails I worked with PHP. At one of my PHP jobs, I worked at a place where our official policy was to use single-quoted strings instead of double-quoted strings. The reason for this policy was that, supposedly, single-quoted strings were parsed ever so slightly faster than double-quoted strings.

In other words, someone in leadership took great care to implement and enforce a policy that was probably responsible for like 0.0001% of the total performance picture for any one of our apps. Penny wise, pound foolish.

Don’t do this. When you’re first building an application, the right approach to performance 99% of the time is to not think about it at all. Unlike bugs, which are best never deployed to production, performance problems are usually best dealt with after they’re discovered in production, after they prove themselves to be legitimate problems.

2. Profile and benchmark before optimizing

When I talk about performance profiling, I mean taking stock of performance across an application and judging where optimization effort is best spent. Some judgment and common sense come into the picture here. For example, if two pages are equally slow, and one of them is visited 100 times a day and the other one 1 time a month, obviously fixing the busier page will give a higher ROI.

In practice I rarely bother to do any actual profiling though. This is partly due to the nature of the work I personally have done historically. Most of my projects have been back-office internal-facing apps where I have a direct line of communication with the users or someone representative of the users. If there’s an important page that’s unacceptably slow, I’ll usually hear complaints about it or I’ll observe the sluggishness firsthand.

The next step I take before setting to work on optimization is to get a benchmark. This is just a fancy way of saying that I measure how fast the page currently loads. I of course can’t know how much of an improvement I made unless I know the difference between the “before” speed and the “after” speed.

The way I typically perform my benchmarking is to simply load a page in my browser while watching the output of the logs in a different window. At the bottom of the log it will say, e.g. “Completed 200 OK in 760ms”. I also use the sql_queries_count gem because sometimes it’s helpful to be aware of how many queries are being executed on the page.

3. The key to performance is usually not to add clever things but to remove stupid things

Performance optimization is often more akin to digging a ditch than to solving a Rubik’s cube.

Typically, the thing responsible for most of the performance cost of a page is waste. There’s a thing that could easily be done in an efficient way, but for whatever reason it was done in an inefficient way. So the task when optimizing a page is to find the waste and remove it. More on this in the next tip.

4. It’s almost always the database

The cause of most performance problems is waste. Most waste takes the form of making too many trips to the database.

This fact is so true and important that, in my 15+ years of programming experience, almost every performance optimization I’ve made has been some variation of “hit the database less”.

In Rails, the most common form of hitting the database too much is the famous “N+1 query problem”. Let’s say you have a page that shows a list of 10 things—let’s say clients—where each list item shows not only the client’s name but the client’s address. This means that a database query occurs for each one of those 10 clients. That’s the N in N+1. The +1 part of N+1 is the original query behind Client.all that grabs all the clients in the first place.

A common solution to the N+1 query problem, one I use a lot is eager loading. Instead of doing Client.limit(10), you can do Client.includes(:address).limit(10), which will grab all associated addresses ahead of time in just one query instead of in 10 separate queries. So instead of a total of 11 queries (1 for all clients, 1 for each of 10 addresses) you’ll have a total of just 2 queries (1 for all clients, 1 for all addresses).

Another way to make fewer trips to the database is to cache the results of expensive queries. I often use Rails’ low-level caching for this. However, this adds a certain amount of complexity that I’m not always eager to add. So I prefer to try to make fewer trips to the databases and/or optimize my queries themselves, resorting to caching only if I have to.

5. If it seems faster, it is faster

The only thing that ultimately matters is how fast users perceive the application to be. If a certain change makes an application feel faster, then for all intents and purposes, it is faster.

I once heard a story about a condo where the residents complained about the elevators being slow. Management’s reaction was not to immediately try to speed up the elevators somehow, which would presumably have been difficult and expensive. Instead, management installed mirrors on the walls next to the elevators. The complaints went away.

So, sometimes the right initial response to a performance problem is not necessarily to embark upon a big, expensive optimization project. Sometimes a change can be introduced that’s less invasive but still effective. For example, let’s say I have a calendar page with back/forward buttons to go from month to month, and let’s say each month takes 800ms to load. If I click the button and nothing at all happens for 800ms, it might feel a little slow. But if I change it so that immediately upon clicking the button I see an animated loading indicator, the page will feel faster. It sounds dumb but it’s absolutely true. Sometimes those little changes that improve the responsiveness of a page will increase its perceived performance, without needing to touch the actual performance at all.

6. Bonus tip: it’s almost never Ruby

Despite what you might read online about Ruby being “slow”, I’ve never ever encountered a performance problem where the culprit was the Ruby language itself. Whether an application is written in Ruby, Go, Python or whatever else, the performance bottleneck is almost always the database.

If all you know about performance is the five tips above, you’ll probably be able to tackle 80% of the performance challenges you encounter.

How to set up Rails secrets

This is part 4 of my series on how to deploy a Ruby on Rails application to AWS. If you found this page via search, I recommend starting from the beginning.

Overview of this step

We need to set up the Rails secrets security feature. It’s a relatively simple step although it does require us to jump through a few hoops.

1. Run rails credentials:edit

First we need to give permission to the current user, ubuntu, so we can make changes.

cd /var/www/hello_world
sudo chown -R ubuntu:ubuntu .

When we run the rails credentials:edit command, it will have us edit a credential file. We need to specify the editor that should be used for this action. In this case I’ll specify Vim.

export EDITOR=vim

Now we need to delete the existing config/credentials.yml.enc or else there will be a conflict.

rm config/credentials.yml.enc

With all these things out of the way, we can finally edit our credential file. No changes to the file are necessary. Just save and exit.

rails credentials:edit

Lastly, we need to give permissions back to the nginx user, www-data. Restart nginx afterward.

sudo chown -R www-data:www-data .
sudo service nginx restart

2. Verify success

Now, if you visit your EC2 instance’s URL in the browser, you should get this error:

The significant thing about this error is that it’s coming from Rails, not nginx. So we’ve made it all the way “to Rails”.

If you run tail -f log/production.log before refreshing the page, you should be able to see the exact error that’s occurring. It should be something like this:

This is telling us there’s no PostgreSQL server running, which is true. We can fix this problem in the next step: setting up our RDS database.

How to deploy a Ruby on Rails application to AWS

Overview

This tutorial will show you how to deploy a Rails application to AWS.

There are a number of ways this task could be tackled. It can be done manually or it can be done using an infrastructure-as-code approach, with a tool like Ansible.

This tutorial shows how to deploy Rails to AWS manually.

I wouldn’t recommend using a manual setup like this for a production Rails project, although I do recommend the experience of going through this manual process for the sake of learning what’s involved. It’s also find to start out hosting an application this way because it’s easy enough to migrate later to a more sophisticated hosting setup.

Before you dive in, be forewarned: it’s kind of a monster of a task. There are a large number of steps involved, many of them tricky and error-prone. Be prepared for the full process to involve hours or even days of potentially frustrating work.

Contents

The size of the setup process makes it impractical to put everything into one post, so each step is its own post.

  1. Launch EC2 instance
  2. Install nginx and Passenger
  3. Add the Rails application to the nginx server
  4. Set up secrets
  5. Create RDS database

Don’t be discouraged if not everything works on the first try. It most likely won’t. My advice if something goes wrong is to just blow everything away and start again from the beginning. I find that that approach is, paradoxically, often the fastest.

Good luck!

How I approach test coverage metrics

Different developers have different opinions about test coverage. Some engineering organizations not only measure test coverage but have rules around it. Other developers think test coverage is basically BS and don’t measure it at all.

I’m somewhere in between. I think test coverage is a useful metric but only in a very approximate and limited sort of way.

If I encounter two codebases, one with 10% coverage and another with 90% coverage, I can of course probably safely conclude that the latter codebase has a healthier test suite. But if there’s a difference of 90% and 100% I’m not convinced that that means much.

I personally measure test coverage on my projects, but I don’t try to optimize for it. Instead, I make testing a habit and let my habitual coding style be my guiding force instead of the test coverage metrics.

If you’re curious what type of test coverage my normal workflow naturally results in, I just checked the main project I’ve been working on for the last year or so and the coverage level is 96.62%, according to simplecov. I feel good about that number, although more important to me than the test coverage percentage is what it feels like to work with the codebase on a day-to-day basis. Are annoying regressions popping up all the time? Is new code hard to write tests for due to the surrounding code not having been written in an easily testable way? Then the codebase could probably benefit from more tests.

My general approach to Rails testing

My development workflow

The code I write is influenced by certain factors upstream of the code itself.

Before I start coding a feature, I like to do everything I can to try to ensure that the user story I’m working on is small and that it’s crisply defined. By small, I mean not more than a day’s worth of work. By crisply defined, I mean that the user story includes a reasonably precise and detailed description of what the scope of that story is.

I also like to put each user story through a reasonably thorough scrutinization process. In my experience, user stories often aren’t very thoroughly thought through and contain a level of ambiguity or inconsistency such that they’re not actually possible to implement as described.

I find that if care is taken to make sure the user stories are high-quality before development work begins, the development work goes dramatically more smoothly.

Assuming I’m starting with good user stories, I’ll grab a story to work on and then break that story into subtasks. Each day I have a to-do list for the day. On that to-do list I’ll put the subtasks for whatever story I’m currently working on. Here’s an example of what that might look like, at least as a first draft:

Feature: As a staff member, I can manage insurance payments

  • Scaffolding for insurance payments
  • Feature spec for creating insurance payment (valid inputs)
  • Feature spec for creating insurance payment (invalid inputs)
  • Feature spec for updating insurance payment

(By the way, I write more about my specific formula for writing feature specs in my post https://www.codewithjason.com/repeatable-step-step-process-writing-rails-integration-tests-capybara/.)

Where my development workflow and my testing workflow meet

Looking at the list above, you can see that my to-do list is expressed mostly in terms of tests. I do it this way because I know that if I write a test for a certain piece of functionality, then I’ll of course have to build the functionality itself as part of the process.

When I use TDD and when I don’t

Whether or not I’ll use TDD on a feature depends largely on whether it’s a whole new CRUD interface or whether it’s a more minor modification.

If I’m working on a whole CRUD interface, I’ll use scaffolding to generate the code, and then I’ll make a pass over everything and write tests. (Again, I write more about the details of this process here.) The fact that I use scaffolding for my CRUD interfaces makes TDD impossible. This is a trade-off I’m willing to make due to how much work scaffolding saves me and due to the fact that I pretty much never forget to write feature specs for my scaffold-generated code.

It’s also rare that I ever need to write any serious amount of model specs for scaffold-generated code. I usually write tests for my validators using shoulda-matchers, but that’s all. (I often end up writing more model specs later as the model grows in feature richness, but not in the very beginning.)

If instead of writing a whole new CRUD interface I’m just making a modification to existing code (or fixing a bug), that’s a case where I usually will use TDD. I find that TDD in these cases is typically easier and faster than doing test-after or skipping tests altogether. If for example I need to add a new piece of data to a CSV file my program generates, I’ll go to the relevant test file and add a failing expectation for that new piece of data. Then I’ll go and add the code to put the data in place to make the test pass.

The other case where I usually practice TDD is if the feature I’m writing is not a CRUD-type feature but rather a more of a model-based feature, where the interesting work happens “under the hood”. In those cases I also find TDD to be easier and faster than not-TDD.

The kinds of tests I write and the kind I don’t

I write more about this in my book, but I tend to mostly write model specs and feature specs. I find that most other types of tests tend to have very little value. By the way, I’m using the language of “spec” instead of “test” because I use RSpec instead of Minitest, but my high-level approach would be the exact same under any testing framework.

When I use mocks and stubs and when I don’t

I almost never use mocks or stubs in Rails projects. In 8+ years of Rails development, I’ve hardly ever done it.

How I think about test coverage

I care about test coverage enough to measure it, but I don’t care about test coverage enough to set a target for it or impose any kind of rule on myself or anything like that. I’ve found that the natural consequence of me following my normal testing workflow is that I end up with a pretty decent test coverage level. Today I checked the test coverage on the project I’ve been working on for the last year or so and the measurement was 97%.

The test coverage metric isn’t the main barometer for me though on the health level of a project’s tests. To me it seems much more useful to pay attention to how many exceptions pop up in production and what it feels like to do maintenance coding on the project. “What it feels like to do maintenance coding” is obviously not a verify quantifiable metric, but of course not everything that counts can be counted.

How I wrote a command-line Ruby program to manage EC2 instances for me

Why I did this

Heroku is great, but not in 100% of cases

When I want to quickly deploy a Rails application, my go-to choice is Heroku. I’m a big fan of the idea that I can just run heroku create and have a production application online in just a matter of seconds.

Unfortunately, Heroku isn’t always a desirable option. If I’m just messing around, I don’t usually want to pay for Heroku features, but I also don’t always want my dynos to fall asleep after 30 minutes like on the free tier. (I’m aware that there are ways around this but I don’t necessarily want to deal with the hassle of all that.)

Also, sometimes I want finer control than what Heroku provides. I want to be “closer to the metal” with the ability to directly manage my EC2 instances, RDS instances, and other AWS services. Sometimes I desire this for cost reasons. Sometimes I just want to learn what I think is the valuable developer skill of knowing how to manage AWS infrastructure.

Unfortunately, using AWS by itself isn’t very easy.

Setting up Rails on bare EC2 is a time-consuming and brain-consuming hassle

Getting a Rails app standing up on AWS is pretty hard and time-consuming. I’m actually not even going to get into Rails-related stuff in this post because even the small task of getting an EC2 instance up and running—without no additional software installed on that instance—is a lot harder than I think it should be, and there’s a lot to discuss and improve just inside that step.

Just to briefly illustrate what a pain in the ass it is to get an EC2 instance launched and to SSH into it, here are the steps. The steps that follow are the command-line steps. I find the AWS GUI console steps roughly equally painful.

1. Use the AWS CLI create-key-pair command to create a key pair. This step is necessary for later when I want to SSH into my instance.

2. Think of a name for the key pair and save it somewhere. Thinking of a name might seem like a trivially small hurdle, but every tiny bit of mental friction adds up. I don’t want to have to think of a name, and I don’t want to have to think about where to put the file (even if that means just remembering that I want to put the key in ~/.ssh, which is the most likely case.

3. Use the run-instances command, using an AMI ID (AMI == Amazon Machine Image) and passing in my key name. Now I have to go look up the run-instances (because I sure as hell don’t remember it) and, look up my AMI ID, and remember what my key name is. (If you don’t know what an AMI ID is, that’s what determines whether the instance will be Ubuntu, Amazon Linux, Windows, etc.)

4. Use the describe-instances command to find out the public DNS name of the instance I just launched. This means I either have to search the JSON response of describe-instances for the PublicDnsName entry or apply a filter. Just like with every AWS CLI command, I’d have to go look up the exact syntax for this.

5. Run the ssh command, passing in my instance’s DNS and the path to my key. This step is probably the easiest, although it took me a long time to commit the exact ssh -i syntax to memory. For the record, the command is ssh -i ~/.ssh/my_key.pem ubuntu@mypublicdns.com. It’s a small pain in the ass to have to look up the public DNS for my instance again and remember whether my EC2 user is going to be ubuntu or ec2-user (it depends on what AMI I used).

My goals for my AWS command-line tool

All this fuckery was a big hassle so I decided to write my own command-line tool to manage EC2 instances. I call the tool Exosuit. You can actually try it out yourself by following these instructions.

There were four specific capabilities I wanted Exosuit to have.

Launch an instance

By running bin/exo launch, it should launch an EC2 instance for me. It should assume I want Ubuntu. It should let me know when the instance is ready, and what its instance ID and public DNS are.

SSH into an instance

I should be able to run bin/exo ssh, get prompted for which instance I want to SSH into, and then get SSH’d into that instance.

List all running instances

I should be able to run bin/exo instances to see all my running instances. It should show the instance ID and public DNS for each.

Terminate instances

I should be able to run bin/exo terminate which will show me all my instance IDs and allow me to select one or more of them for termination.

How I did it

Side note: when I first wrote this, I forgot that the AWS SDK for Ruby existed, so I reinvented some wheels. Whoops. After I wrote this I refactored the project to use AWS SDK instead of shell out to AWS CLI.

For brevity I’ll focus on the bin/exo launch command.

Using the AW CLI run-instances command

The AWS CLI command for launching an instance looks like this:

aws ec2 run-instances \
  --count 1 \
  --image-id ami-05c1fa8df71875112 \
  --instance-type t2.micro \
  --key-name normal-quiet-carrot \
  --profile personal

Hopefully most of these flags are self-explanatory. You might wonder where the key name of normal-quiet-carrot came from. When the bin/exo launch command is run, Exosuit asks “Is there a file defined at .exosuit/config.yml that contains a key pair name and path? If not, create that file, create a new key pair with a random phrase for a name, and save the name and path to that file.”

Here’s what my .exosuit/config.yml looks like:

---
aws_profile_name: personal
key_pair:
  name: normal-quiet-carrot
  path: "~/.ssh/normal-quiet-carrot.pem"

The aws_profile_name is something that I imagine most users aren’t likely to need. I personally happen to have multiple AWS accounts, so it’s necessary for me to send a --profile flag when using AWS CLI commands so AWS knows which account of mine to use. If a profile isn’t specified in .exosuit/config.yml, Exosuit will just leave the --profile flag off and everything will still work fine.

Abstracting the run-instances command

Once I had coded Exosuit to construct a few different AWS CLI commands (e.g. run-instances, terminate-instances), I noticed that things were getting a little repetitive. Most troubling, I had to always remember to include the --profile flag (just as I would if I were typing all this on the command line manually), and I didn’t always remember to do so. In those cases my command would get sent to the wrong account. That’s bad.

So I created an abstraction called AWSCommand. Here’s what a usage of it looks like:

command = AWSCommand.new(
  :run_instances,
  count: 1,
  image_id: IMAGE_ID,
  instance_type: INSTANCE_TYPE,
  key_name: key_pair.name
)

JSON.parse(command.run)

You can probably see the resemblance it bears to the bare run-instances usage. Note the conspicuous absence of the profile flag, which is now automatically included every single time.

Listening for launch success

One of my least favorite things about manually launching EC2 instances is having to check periodically to see when they’ve started running. So I wanted Exosuit to tell me when my EC2 instance was running.

I achieved this by writing a loop that hits AWS once per second, checking the state of my new instance each time.

module Exosuit
  def self.launch_instance
    response = Instance.launch(self.key_pair)
    instance_id = response['Instances'][0]['InstanceId']
    print "Launching instance #{instance_id}..."

    while true
      sleep(1)
      print '.'
      instance = Instance.find(instance_id)

      if instance && instance.running?
        puts
        break
      end
    end

    puts 'Instance is now running'
    puts "Public DNS: #{instance.public_dns_name}"
  end
end

You might wonder what Instance.find and instance.running? do.

The Instance.find method will run the aws ec2 describe-instances command, parse the JSON response, then grab the relevant JSON data for whatever instance_id I passed to it. The return value is an instance of the Instance class.

When an instance of Instance is instantiated, an instance variable gets set (pardon all the “instances”) with all the JSON data for that instance that was returned by the AWS CLI. The instance.running? method simply looks at that JSON data (which has since been converted to a Ruby hash) and checks to see what the value of ['State']['Name'] is.

Here’s an abbreviated version of the Instance class for reference.

module Exosuit
  class Instance
    def initialize(info)
      @info = info
    end

    def state
      @info['State']['Name']
    end

    def running?
      state == 'running'
    end
  end
end

(By the way, all the Exosuit code is available on GitHub if you’d like to take a look.)

Success notification

As you can see from the code a couple snippets above, Exosuit lets me know once my instances has entered a running state. At this point I can run bin/exo ssh, bin/exo instances or bin/exo terminate to mess with my instance(s) as I please.

Demo video

Here’s a small sample of Exosuit in action:

Try it out yourself

If you’d like to try out Exosuit, just visit the Getting Started with Exosuit guide.

If you think this idea is cool and useful, please let me know by opening a GitHub issue for a feature you’d like to see, or tweeting at me, or simply starring the project on GitHub so I can gage interest.

I hope you enjoyed this explanation and I look forward to sharing the next steps I take with this project.

Exosuit demo video #1: launching and SSHing into an EC2 instance

Update: this video is now out of date. See demo video #2 for a more up-to-date version.

Recently I decided to begin work on a tool that makes it easier to deploy Rails apps to AWS. My wish is for something that has the ease of use of Heroku, but the fine-grained control of AWS.

My tool, which is free and open source, is called Exosuit. Below is a demo video of what Exosuit can do so far which, given the fact that Exosuit has only existed since the day before this writing, isn’t very much. Currently Exosuit can launch an EC2 instance for you and let you SSH into it.

But I think even this little bit is pretty cool – I don’t know of any other method that lets you go from zero to SSH’d into your EC2 instance in 15 seconds like Exosuit does.

If you’d like to take Exosuit for a spin on your own computer, you can! Just visit the Exosuit repo and go to the getting started guide. And if you do try it, please tweet me or send an email to jason@codewithjason.com with any thoughts or feedback you might have.