Overview
This tutorial will show you how to deploy a Rails application to AWS Elastic Beanstalk.
Using Elastic Beanstalk is just one of many (perhaps an infinite number of!) AWS deployment options. Each approach has different pros and cons. I’ll briefly go over some of them because it’s good to understand the pros and cons of various approaches (at least to an extent) before choosing one.
Manual EC2 deployment
One option is to do things “the old fashioned way” and manually set up a Rails application on a single EC2 instance. This is the approach I go over in this AWS/Rails deployment post and it’s perfectly fine for hobby projects where the stakes are low.
The downside to manual EC2 deployment is you end up with a snowflake server, a server with a one-of-a-kind configuration that’s hard to understand, modify, or replicate.
Elastic Beanstalk
Elastic Beanstalk is kind of analogous to Heroku. The basic idea is the same in that both Elastic Beanstalk and Heroku are abstraction layers on top of AWS services. The big difference is that Heroku is generally really easy and Elastic Beanstalk is a giant pain in the ass.
But the upside is that EB provides more easily replicable and understandable server instances than a manual EC2 instance. The server configuration is expressed in files, and then that configuration can be applied to an indefinite number of servers. This makes scaling easier. It’s also nice to know that if I somehow accidentally blow away one of my EC2 instances, EB will just automatically spin up a new identical one for me.
Another drawback to EB is that I understand EB can be kind of overly rigid. I ran into this trouble myself on a project where I needed to set up Sidekiq. I discovered that EB boxed me in in a way that made Sidekiq setup very difficult. So for a production project that grows over time, EB is perhaps a good place to start, but it should be expected that you might want to migrate to something more flexible sometime in the future.
An infrastructure-as-code approach
An infrastructure-as-code approach is probably the best long-term solution, although it currently also seems to be the most difficult and time-consuming to set up initially.
Options in this area include Ansible, Chef, Puppet, ECS, and probably a lot more. I’ve personally only used Ansible. I found Ansible to be great. This post will of course only cover Elastic Beanstalk though.
Configuration steps
Here are the steps we’ll be carrying out in this tutorial.
- Install the Elastic Beanstalk CLI
- Create the Elastic Beanstalk application
- Create the Elastic Beanstalk environment
- Create the RDS instance
- Deploy
Let’s get started.
Install the Elastic Beanstalk CLI
Much of what we’ll be doing involves the Elastic Beanstalk CLI (command-line interface). It can be installed with this command:
$ brew update && brew install awsebcliCreate the Elastic Beanstalk application
Now cd into the directory that contains your Rails project and run eb init.
$ eb initWhen prompted, Select Create new Application. Accept the defaults for all other options.
When this command finishes running you’ll end up with a file called .elasticbeanstalk/config.yml that looks something like this:
branch-defaults:
  master:
    environment: null
    group_suffix: null
global:
  application_name: discuss_with
  branch: null
  default_ec2_keyname: aws-eb-cwj-post
  default_platform: Ruby 2.6 (Passenger Standalone)
  default_region: us-east-1
  include_git_submodules: true
  instance_profile: null
  platform_name: null
  platform_version: null
  profile: personal
  repository: null
  sc: git
  workspace_type: Application
Now that we’ve created our Elastic Beanstalk application, we’ll need to create an Elastic Beanstalk environment inside of that application. I typically set up one production environment and one staging environment inside a single application.
Create the Elastic Beanstalk environment
The command to create an environment is eb create.
$ eb createYou’ll be prompted for what to call your environment. I called mine discuss-with-production.
For load balancer type, choose application.
This step will take a long time. When it finishes, health will probably be “Severe”. Ignore this.
Set up SECRET_KEY_BASE
We’ll need to set a value for the SECRET_KEY_BASE environment variable. This can be done using the following eb setenv command which just sets the variable to a random string.
$ eb setenv SECRET_KEY_BASE=$(ruby -e "require 'securerandom';puts SecureRandom.hex(64)")Set up ebextensions
With Elastic Beanstalk, you can add files in an .ebextensions directory at your project root to control how your server is configured. We need to add three ebextensions files.
The first, .ebextensions/01_ruby.config, looks like this:
packages:
  yum:
    git: []

container_commands:
  01_assets:
    command: RAILS_ENV=production bundle exec rake assets:precompile
    leader_only: true
The second, .ebextensions/02_yarn.config, looks like this:
commands:

  01_node_get:
    cwd: /tmp
    command: 'sudo curl --silent --location https://rpm.nodesource.com/setup_13.x | sudo bash -'

  02_node_install:
    cwd: /tmp
    command: 'sudo yum -y install nodejs'

  03_yarn_get:
    cwd: /tmp
    # don't run the command if yarn is already installed (file /usr/bin/yarn exists)
    test: '[ ! -f /usr/bin/yarn ] && echo "yarn not installed"'
    command: 'sudo wget https://dl.yarnpkg.com/rpm/yarn.repo -O /etc/yum.repos.d/yarn.repo'

  04_yarn_install:
    cwd: /tmp
    test: '[ ! -f /usr/bin/yarn ] && echo "yarn not installed"'
    command: 'sudo yum -y install yarn'
The last, .ebextensions/gem_install_bundler.config, looks like this:
files:
  "/opt/elasticbeanstalk/hooks/appdeploy/pre/09_gem_install_bundler.sh" :
    mode: "000775"
    owner: root
    group: users
    content: |
      #!/usr/bin/env bash

      EB_APP_STAGING_DIR=$(/opt/elasticbeanstalk/bin/get-config container -k app_staging_dir)
      EB_SCRIPT_DIR=$(/opt/elasticbeanstalk/bin/get-config container -k script_dir)
      # Source the application's Ruby
      . $EB_SCRIPT_DIR/use-app-ruby.sh

      cd $EB_APP_STAGING_DIR
      echo "Installing compatible bundler"
      gem install bundler -v 2.0.2
Deploy the application
Now we can make our first deployment attempt.
$ eb deployUnfortunately, it doesn’t work. We get an error that says: /opt/elasticbeanstalk/hooks/appdeploy/pre/12_db_migration.sh failed.
Why does this happen? Because he haven’t set up a database yet. Let’s do that now.
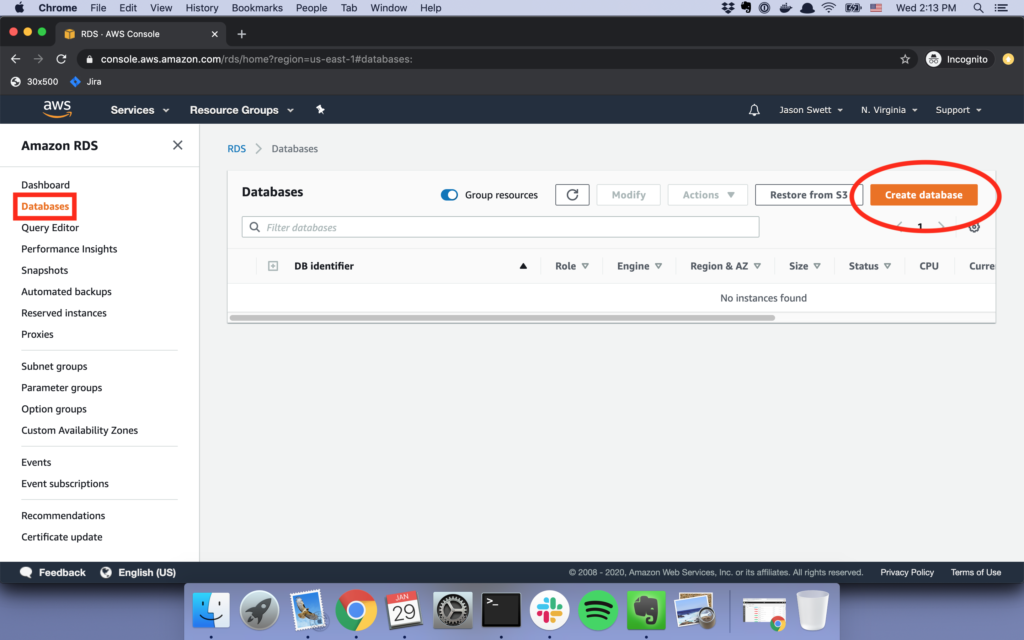
Create the RDS instance
In the AWS console, go to RDS, go to Databases, and click Create database.
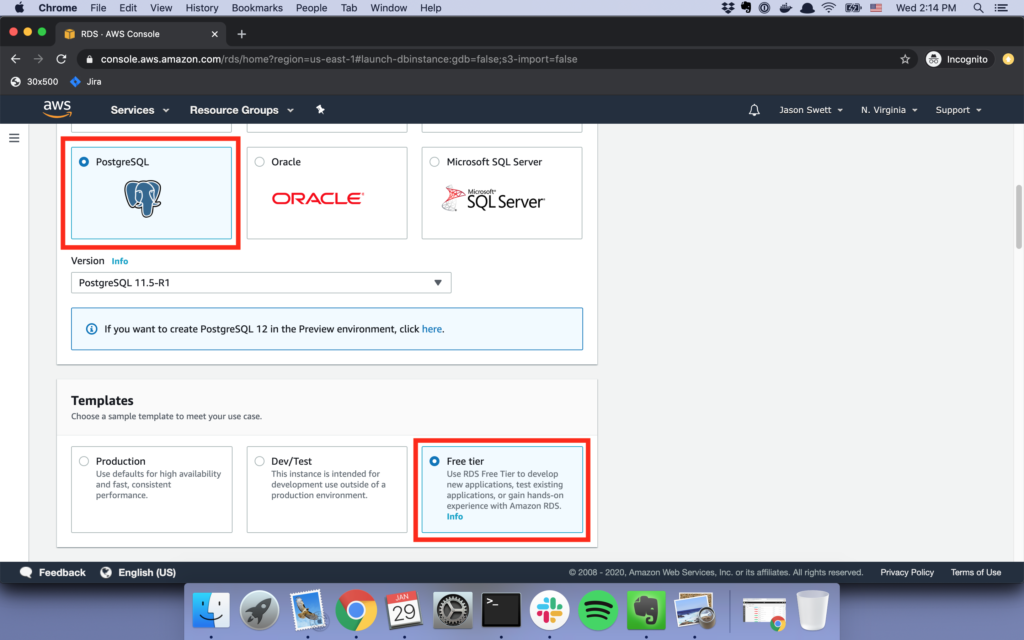
Choose Postgresql and Free tier.
Choose whatever name you like for your database. I’m calling mine discuss-with-production
For size, choose t2.micro.
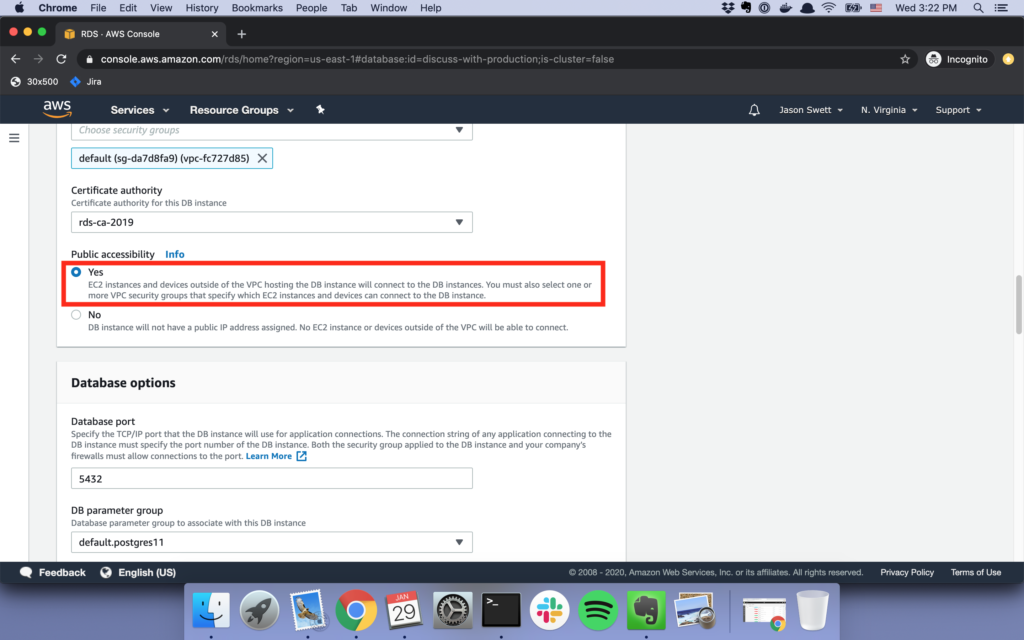
Make sure to set public accessibility to Yes so you can remotely connect to your database from your development machine.
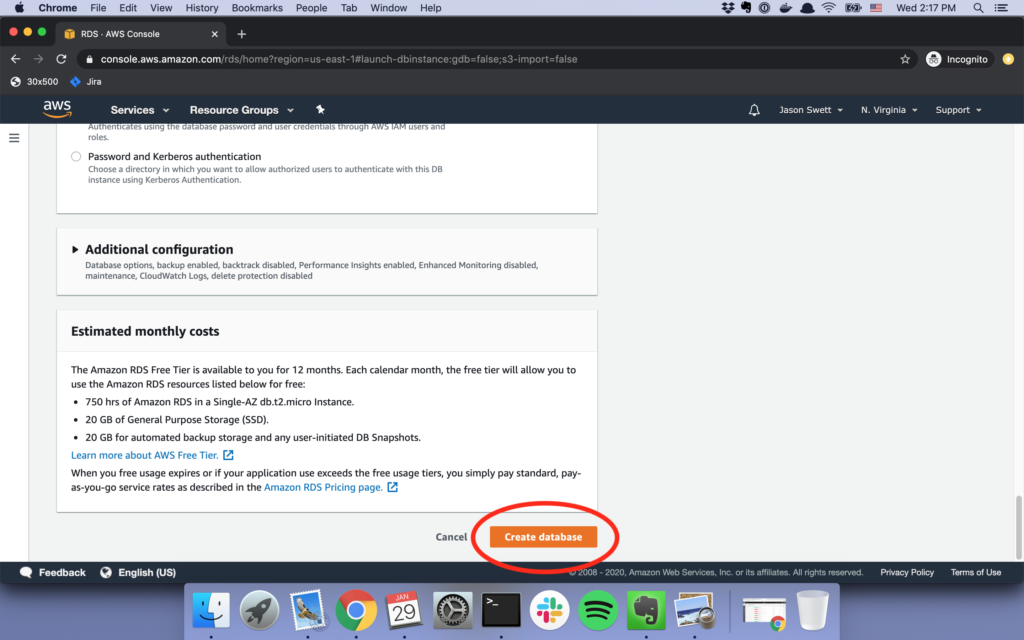
Click Create database.
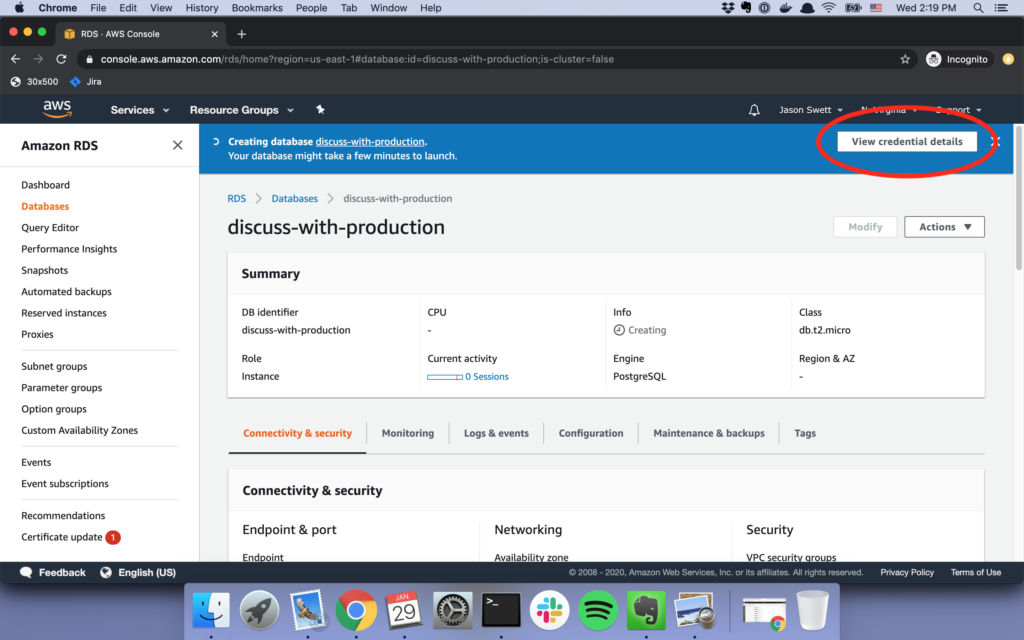
On the next screen, click View credential details.
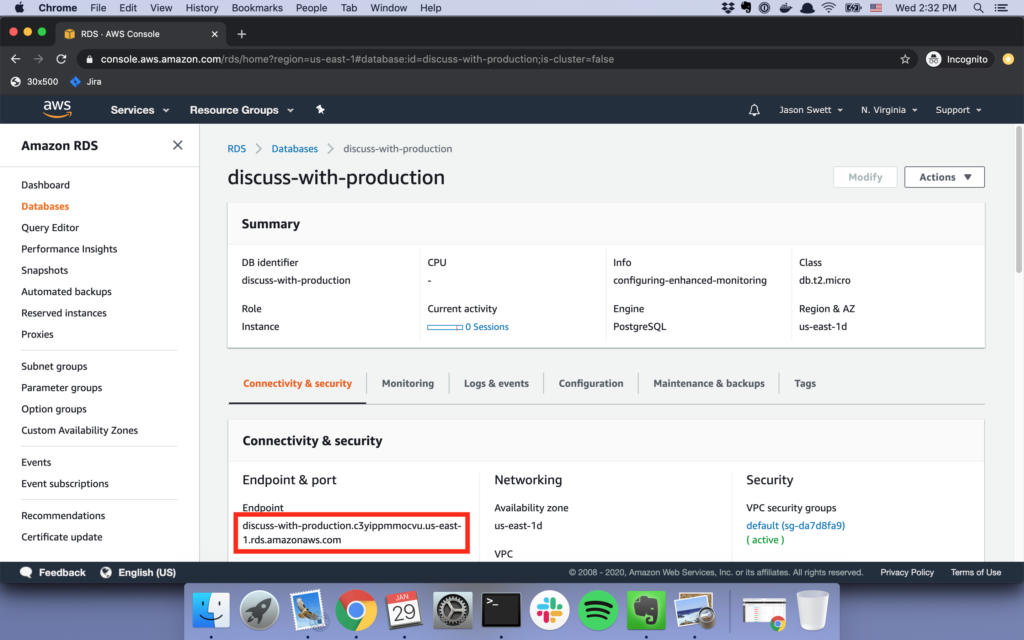
Copy what’s there to a separate place for later use. You’ll also need the RDS instance’s endpoint URL which is found in a different place, under Connectivity & security and then Endpoint & port.
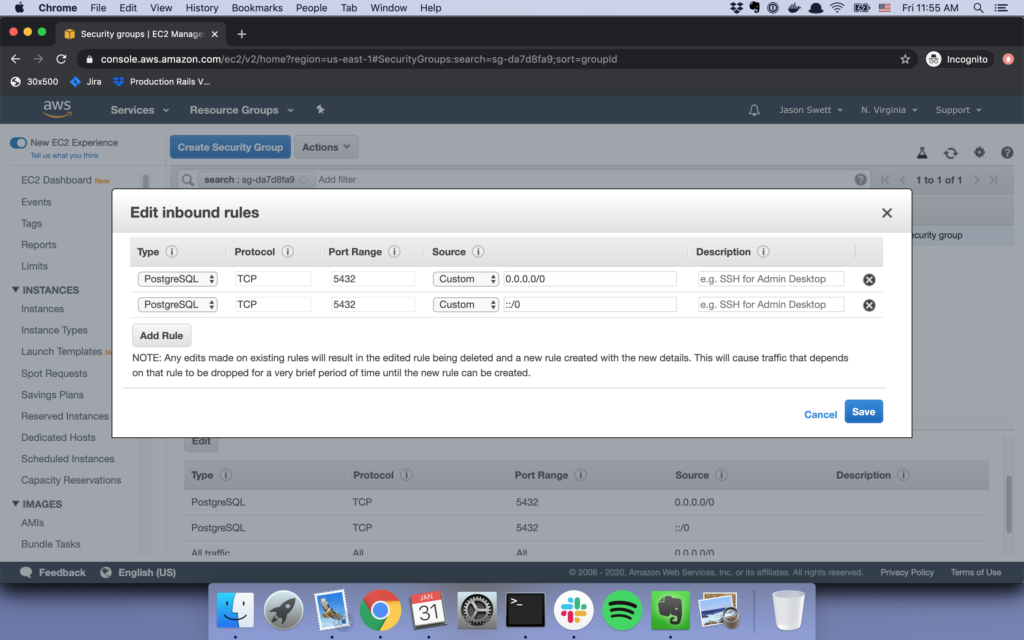
Make sure your database’s security group has port 5432 open.
Set the database credentials and create the database instance
Our production server will need to know the database endpoint URL and database credentials. Run the eb setenv command, with your own values of course replaced for mine, to set these values.
$ eb setenv RDS_DATABASE=discuss-with-production RDS_USERNAME=postgres RDS_PASSWORD=your-password RDS_HOST=your-endpoint-urlEven though the RDS instance exists, our actual PostgreSQL instance doesn’t exist yet. The RDS instance itself is more like just a container. We can run the rails db:create command remotely on the RDS instance by supplying the RDS endpoint URL when we run rails db:create.
Before running this command, make sure the production section of config/database.yml matches up with these environment variable names as follows:
production:
  <<: *default
  database: <%= ENV['RDS_DATABASE'] %>
  username: <%= ENV['RDS_USERNAME'] %>
  password: <%= ENV['RDS_PASSWORD'] %>
  host: <%= ENV['RDS_HOST'] %>
  port: 5432
Now create the database.
$ RDS_DATABASE=discuss-with-production RDS_USERNAME=postgres RDS_PASSWORD=your-password RDS_HOST=your-endpoint-url rails db:createDeploy the application
Now the application can finally be deployed for real using eb deploy.
$ eb deployOnce this finishes you can use the eb open command to visit your environment’s URL in the browser.
$ eb open[xyz-ihs snippet=”rails-tips-opt-in”]
This is a great tutorial. Better than the AWS one which seems to leave stuff out? I still get ‘502 Bad Gateway nginx/1.16.1’ error. I deployed my app, created a database in RDS and set up the environment but still no luck. I’m using Rails 6. Any ideas?
:
Thanks! Looks like you got past this particular issue. I replied to your other comment.
Hi Jason I am also getting 502 Bad Gateway error any ideas ?
It appears the main problem is that the EB environment can’t locate a gem file:
/opt/rubies/ruby-2.6.5/lib/ruby/site_ruby/2.6.0/bundler.rb:237:in `rescue in root’: Could not locate Gemfile or .bundle/ directory (Bundler::GemfileNotFound)
from /opt/rubies/ruby-2.6.5/lib/ruby/site_ruby/2.6.0/bundler.rb:233:in `root’
from /opt/rubies/ruby-2.6.5/lib/ruby/site_ruby/2.6.0/bundler.rb:80:in `bundle_path’
from /opt/rubies/ruby-2.6.5/lib/ruby/site_ruby/2.6.0/bundler.rb:554:in `configure_gem_home’
from /opt/rubies/ruby-2.6.5/lib/ruby/site_ruby/2.6.0/bundler.rb:535:in `configure_gem_home_and_path’
from /opt/rubies/ruby-2.6.5/lib/ruby/site_ruby/2.6.0/bundler.rb:66:in `configure’
from /opt/rubies/ruby-2.6.5/lib/ruby/site_ruby/2.6.0/bundler.rb:134:in `definition’
from /opt/elasticbeanstalk/support/scripts/check-for-gem.rb:21:in `’
When exactly do you get this error? When you do `eb deploy`?
Jason, thanks for the tutorial! Followed it and got stuck at asset precompile failure.
`Hook /opt/elasticbeanstalk/hooks/appdeploy/pre/11_asset_compilation.sh failed. For more detail, check /var/log/eb-activity.log using console or EB CLI.`
`[ec2-user ~]$ tail -n 300 /var/log/eb-activity.log | grep 11_asset_compilation.sh`
`[2020-04-06T23:31:29.290Z] INFO [26374] – [Application update app-3334-200406_163001@5/AppDeployStage0/AppDeployPreHook/11_asset_compilation.sh] : Starting activity…
[2020-04-06T23:32:48.804Z] INFO [26374] – [Application update app-3334-200406_163001@5/AppDeployStage0/AppDeployPreHook/11_asset_compilation.sh] : Activity execution failed, because: ++ /opt/elasticbeanstalk/bin/get-config container -k script_dir
[2020-04-06T23:32:48.804Z] INFO [26374] – [Application update app-3334-200406_163001@5/AppDeployStage0/AppDeployPreHook/11_asset_compilation.sh] : Activity failed.`
I should add this is during `eb deploy` process. Any ideas?
I generally find the EB logs pretty hard to parse. When you ran `eb deploy` was there any output that seemed remotely helpful?
Also, just in case it helps, here’s a video where I debug some `eb deploy` problems. My problem is different but you might get some ideas from my troubleshooting tactics. https://www.youtube.com/watch?v=GYvyyAxcSq4&lc=z22mdnqh2nyngje4m04t1aokgpjyi1rgu4mebb02ii2grk0h00410&feature=em-comments
Did you use any existing source code for this build, Your steps dont mention any of the git repos so this is going to deploy the default sample app. WHich deployed successfully on eb create command and did not throw any RDS db migrate error like you mentioned in your post. Another thing which is not explained as in why your are doing any of the ebextension config files the default app deploys w/o any of it. Can you explain why and in what scenarios those steps are required?
Regarding the source code, I believe I used this repo: https://github.com/jasonswett/discuss_with
I also have a video here of me deploying to Elastic Beanstalk: https://www.youtube.com/watch?v=Uy37bFMtmRA&list=PLYzYlrv4LHcgIuymTahL3UIlzS8fMTVOz&index=4
My recollection is that the ebextension stuff was necessary because without it Yarn didn’t work and asset precompilation didn’t work right.
Hello, it gives an error like this. any idea ?
2020-12-01 19:30:26 INFO Deploying new version to instance(s).
2020-12-01 19:32:57 ERROR [Instance: i-09dda98d464f212c3] Command failed on instance. Return code: 1 Output: (TRUNCATED)…” “rebuild” “–verbose” “–libsass_ext=” “–libsass_cflags=” “–libsass_ldflags=” “–libsass_library=”
gyp ERR! cwd /var/app/ondeck/node_modules/node-sass
gyp ERR! node -v v15.3.0
gyp ERR! node-gyp -v v3.8.0
gyp ERR! not ok
Build failed with error code: 1.
container_command 01_assets in .ebextensions/01_ruby.config failed. For more detail, check /var/log/eb-activity.log using console or EB CLI.
Hey Jason. Let me first introduce my self. I’m a Senior iOS Engineer and have no experience with AWS deployment. I do know a little bit when it comes to nodejs and rails (both local only).
I took my time to send you my gratitude. This tutorial saved me from going insane. I have been trying to deploy to AWS/EBS a locally running small rails project. But it always failed.
That’s all. Thank you so much again!
Glenn
Thanks!! Glad to know it was helpful.
In .ebextensions/gem_install_bundler.config file. what do you mean by # Runs before `./10_bundle_install.sh`? we don’t have such a file called 10_bundle_install.sh
I think that was just a typo, sorry