A common Rails testing question is which testing framework to use. RSpec and Minitest are the two that most people are deciding between. To many beginners it’s not clear which is the better choice.
We could weigh the technical pros and cons of each framework. Many people find things to love and hate about both RSpec and Minitest. You can find some passionate flame wars online if you look.
But before we get into all that, there are some realities to consider that overshadow the relative technical merits of the two frameworks. There are two particular facts we should think about.
Fact #1: usually, someone else decides for you
Most of us don’t have much choice as to whether to use RSpec or Minitest at work.
At some point we’ll get a job. At that job they’ll either use RSpec there or Minitest (or something else or nothing at all). Whatever they use at work, that’s what we’ll be using. Our personal preferences are moot.
Fact #2: usually, they’ve chosen RSpec
For better or worse, it’s my experience and the experience of most Rails developers I’ve talked with that most commercial projects use RSpec. (Note how I said most commerical projects. Most commercial projects use RSpec and most OSS Ruby projects, in my experience, use Minitest. I do not know why this is the way it is.)
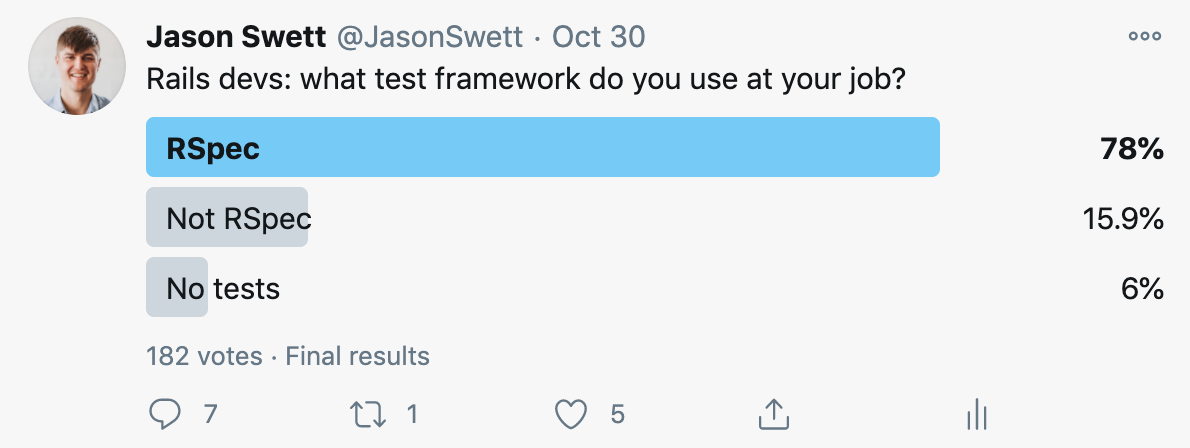
Out of curiosity I did a (totally unscientific) poll regarding which test framework they use at work. Take it with a grain of salt, but here are the results.
Even if my numbers are off by quite a bit, RSpec is still the more popular framework.
What does this mean?
My take is that this means if your goal is to get a Rails job, learning RSpec over Minitest will give you a higher probability that your skills match the tech stack that’s used at any particular company.
Some people may object to this way of looking at it. They might argue that if you always you go with whatever’s most popular instead of what’s the best technical choice, you may end up using a Windows laptop or switching from Rails to Node.js.
This argument is flawed though. We’re free to make our own choices on the big things but we can’t dictate what comes along with those choices. We can choose to use Rails instead of a different framework, but we can’t reasonably say that we’re only going to work on Rails projects that use, for example, Minitest and MySQL and Angular and no other combination of technologies. We have to compromise a little or face extremely limited job options.
Also, it doesn’t matter much
Having said all that, I actually don’t believe your choice of which test framework to learn matters!
RSpec and Minitest differ syntactically but they don’t really have meaningful conceptual differences. The principles of testing are the same regardless of which test framework you’re using, or even which language you’re using for that matter.
You’re very unlikely to become an expert in Minitest and then get turned down for a job because they use RSpec there, or vice versa. Employers typically realize that if someone is skilled with testing, they’ll be able to pick up any test framework relatively easily.
So try both
In a sense it might sound depressing that the answer to the RSpec/Minitest question is a) we don’t have a choice and b) it doesn’t matter anyway. I actually find these facts freeing.
If the choice between RSpec and Minitest doesn’t matter that much then we’re free to evaluate both according to our own independent judgment and taste and not worry about whether we’re making the “right” choice. Whatever we choose, we’re likely to develop skills that will apply to any job, whether they use Minitest or RSpec there.
So my advice is to try both frameworks and see which one you like better. Neither one is objectively superior to the other.
But if you just want me to pick for you, I say RSpec
My very simplistic logic is that RSpec is what you’ll most likely be forced to use at work, so that’s what you might as well learn.
But again, I encourage you to try both and decide for yourself. This is ultimately not a very important decision. Learning testing principles is much more important than learning testing frameworks.
Below is how I set up a fresh Rails application for testing. I’ll describe it in three parts:
An application template that can add all the necessary gems and configuration
My setup process (commands I run to create a new Rails app)
A breakdown of the gems I use
Let’s start with the application template.
My application template
First, if you don’t know, it’s possible to create a file called an application template that you can use to create a Rails application with certain code or configuration included. This is useful if you create a lot of new Rails applications with parts in common.
Here’s an application template I created that will do two things: 1) install a handful of testing-related gems and 2) add a config file that will tell RSpec not to generate certain types of files. A more detailed explanation can be found below the code.
gem_group :development, :test do
  gem 'rspec-rails'
  gem 'factory_bot_rails'
  gem 'capybara'
  gem 'webdrivers'
  gem 'faker'
end

initializer 'generators.rb', <<-CODE
  Rails.application.config.generators do |g|
    g.test_framework :rspec,
      fixtures:         false,
      view_specs:       false,
      helper_specs:     false,
      routing_specs:    false,
      request_specs:    false,
      controller_specs: false
  end
CODE
The first chunk of code will add a certain set of gems to my Gemfile. A more detailed explanation of these gems is below.
The second chunk of code creates a file at config/initializers/generators.rb. The code in the file says “when a scaffold is generated, don’t generate files for fixtures, view specs, helper specs, routing specs, request specs or controller specs”. There are certain kinds of tests I tend not to write and I don’t want to clutter up my codebase with a bunch of empty files. That’s not to say I never write any of these types of tests, just sufficiently rarely that it makes more sense for me to create files manually in those cases than for me to allow files to get generated every single time I generate a scaffold.
The setup process
When I run rails new, I always use the -T flag for “skip test files” because I always use RSpec instead of the Minitest that Rails comes with by default.
Also, incidentally, I always use PostgreSQL. This choice of course has little to do with testing but I’m including it for completeness.
In this particular case I’m also using the -m flag so I can pass in my application template. Application templates can be specified using either a local file path or a URL. In this case I’m using a URL so that you can just copy and paste my full rails new command as-is if you want to.
$ rails new my_project -T -d postgresql \
  -m https://raw.githubusercontent.com/jasonswett/testing_application_template/master/application_template.rb
Once I’ve created my project, I add it to version control. (I could have configured my application template to do this step manually, but I wanted to explicitly show it as a separate step, partially to keep the application template clean and easily understandable.)
$ git add .
$ git commit -a -m'Initial commit'
The gems
Here’s an explanation of each gem I chose to add to my project.
rspec-rails
RSpec is one of the two most popular test frameworks for Rails, the other being Minitest.
The rspec-rails gem is the version of the RSpec gem that’s specifically fitted to Rails.
factory_bot_rails
Factory Bot is a tool for generating test data. Most Rails projects that use RSpec also use Factory Bot.
Like rspec-rails, factory_bot_rails is a Rails-specific version of a more general gem, factory_bot.
capybara
Capybara is a tool for writing acceptance tests, i.e. tests that interact with the browser and simulate clicks and keystrokes.
The underlying tool that allows us to simulate user input in the browser is called Selenium. Capybara allows us to control Selenium using Ruby.
webdrivers
In order for Selenium to work with a browser, Selenium needs drivers. There are drivers for Chrome, drivers for Edge, etc. Unfortunately it can be somewhat tedious to keep the drivers up to date. The webdrivers gem helps with this.
faker
By default, Factory Bot (the tool for generating test data) will give us factories that look something like this:
FactoryBot.define do
  factory :customer do
    first_name { "MyString" }
    last_name { "MyString" }
    email { "MyString" }
  end
end
This is fine for just one record but becomes a problem if we have multiple records plus a unique constraint. If in this example we require each customer to have a unique email address, then we’ll get a database error when we create two customer records because the email address of MyString will be a duplicate.
One possible solution to this problem is to replace the instances of "MyString" with something like SecureRandom.hex. I don’t like this, though, because I often find it helpful if my test values resemble the kinds of values they’re standing in for. With Faker, I can do something like this:
FactoryBot.define do
  factory :customer do
    first_name { Faker::Name.first_name }
    last_name { Faker::Name.last_name }
    email { Faker::Internet.email }
  end
end
This can make test problems easier to troubleshoot than when test values are simply random strings like c1f83cef2d1f74f77b88c9740cfb3c1e.
Honorable mention
I also often end up adding the VCR and WebMock gems when I need to test functionality that makes external network requests. But in general I don’t believe in adding code or libraries speculatively. I only add something once I’m sure I need it. So I typically don’t include VCR or WebMock in a project from the very beginning.
Next steps
After I initialize my Rails app, I usually create a walking skeleton by deploying my application to a production and staging environment and adding one small feature, for example the ability to sign in. Building the sign-in feature will prompt me to write my first tests. By working in this way I front-load all the difficult and mysterious work of the project’s early life so that from that point on, my development work is mostly just incremental.
If you’re brand new to Rails testing and would like to see an example of how I would actually write a test once I have the above application set up, I might recommend my Rails testing “hello world” post.
The very real danger of misinterpreting a feature requirement
When I was a young and inexperienced developer I often failed to build a feature the right way the first time.
My memory is that, often, I would show what I built to my stakeholder (stakeholder meaning boss or freelance client) and the stakeholder would say that what I built didn’t really resemble what we had talked about.
I would then go away, embarrassed and surprised, and make another attempt. Sometimes this process would be repeated multiple times before we finally got on the same page. It sucked. It was obviously a bad experience for both myself and my stakeholder. Yet, unfortunately, this was the way things normally went.
The glory of getting it right the first time
I don’t have this problem anymore. Today, when I build a feature, I typically do get it right the first time.
It’s true that the feature still sometimes has to be tweaked after the first pass, but this is usually not because I misunderstood my stakeholder, but because neither myself nor my stakeholder could imagine the ideal version of the feature without seeing a rough draft first. Today I almost never have the “this isn’t what we talked about” problem.
So what changed? How did I go from being so terrible at understanding feature requirements to being so good at it? I’ll tell you, but first let me explain the reasons why it’s so hard to understand a feature’s requirements.
Why it’s so hard to understand a feature’s requirements the first time
It’s hard to communicate things
Conveying things in high fidelity from one person’s mind to another is notoriously hard. It’s basically impossible to say something of any complexity to another person and have them understand exactly what you mean.
Imagine you’ve never been to Paris before. Then you schedule a trip to Paris. Some people tell you in detail what kind of stuff is in Paris. You read some books about the place. Then, when you actually get to Paris, much of the experience is nothing like you imagined.
And Paris actually exists! Think of how much harder it gets when the thing being communicated is just an idea in someone’s mind. This brings me to the next reason why it’s hard to understand a feature’s requirements the first time.
Sometimes the stakeholder doesn’t even understand what the stakeholder means
Just because someone describes a feature requirement to you doesn’t mean that that feature idea is complete, self-consistent, or the right thing to build. When I was less experienced I tended to think of the requirements as The Requirements. I didn’t always realize that the “requirements” were often just half-baked ideas that needed a lot of polishing before they were really ready to be implemented.
Even if a particular feature does make sense and could conceivably be built, there’s often an issue of scoping ambiguity. When we say we’re going to build Feature X, where exactly are the contours of Feature X? What’s inside the scope and Feature X and what’s outside it? These questions need to be answered in detail before the feature can be successfully built. Otherwise the development of the feature tends to drag on, getting kicked from sprint to sprint, with both developers and stakeholders getting increasingly frustrated as the feature fails to reach a state of doneness.
How to understand a feature’s requirements the first time
The secret to understanding a feature’s requirements is to do two things:
Perform usability tests to flesh out the feature and verify the feature’s logical consistency and suitability for the task
Make a detailed written/graphical agreement with the stakeholder regarding what the feature is
I’ll explain each of these things individually.
Usability testing
At some point early in my career I got tired of building the wrong thing over and over. So I decided to try to figure out how to stop making that mistake. I started researching “user interface design” and found a book called User Interface Design by Soren Lauesen (which remains one of the best software books I’ve ever read). This was when I first learned about usability testing.
Usability testing is a topic big enough to fill a book (or a lot of books, actually), so I can only scratch the surface here, but here’s the basic idea.
There are two important truths in usability testing. The first is that for all but the simplest features, it’s impossible to come up with a usable design on the first try. (By “usable design”, I mean a design that’s complete enough that the user can carry out their business and that’s sufficiently unconfusing that the user doesn’t throw their hands up in frustration along the way.)
The second truth is that the only way to tell whether a design is sufficiently usable is to test it.
If you buy these two axioms, here’s how to actually perform usability testing, or at least how I do it.
The first step is to talk with the stakeholder to gain an understanding of the feature’s requirements. I don’t have any special methodology for this one, although I’ll give two tips. First, at the risk of stating the obvious, it’s a good idea to write down the things the stakeholder says. Second, it’s a good idea to repeat your understanding of the requirements to the stakeholder and ask if your understanding is consistent with what they’re thinking.
The next step is to translate the requirements into a visual UI design. If I’m working in-person, I usually start really lo-fi and just draw wireframes with pen and paper. If I’m working remotely, I’ll use Balsamiq. The point is that I know my early attempts will probably be off the mark, so I want to use methods that will allow me a quick turnaround time.
Once I have the first draft my design prototypes ready I’ll get together with either an actual user of the system I’m working on or someone who’s representative of a user. Sometimes that person and the stakeholder are the same person and sometimes they’re not. Sometimes no such person is available and I have to get some random person to serve in the role. Sometimes I just have to use the stakeholder in that role, even if it’s not ideal. In any case, it’s best if the test user is someone who’s not involved with the design work. Anyone who’s too familiar with the feature already will fail to stumble over the design’s confusing parts and the usability testing process will be less fruitful.
Once I’ve found my test user I’ll have a usability testing meeting. Ideally, the meeting involves a facilitator, the test user, and a record keeper. I myself typically serve in the facilitator role. Before the meeting, I as facilitator will have come up with a handful of test scenarios for us to go through. For example, a test scenario might say, “Wanda Smith enters the hotel and wants to book a room for two nights. Find the available options in the system and complete the transaction.” For each test scenario, I’ll give the test user the appropriate starting design (which is a piece of paper with a single web page’s wireframes on it) and instruct the test user to “click” on things with their pen and to fill out forms with the pen just like they would on a web page. When the test user “submits” a form, I take away that piece of paper and give them the appropriate subsequent page.
I want to emphasize that never in this process do I ask the test user what they “think” of the design. When asked what they “think” of a design, people will typically just say that it looks good. This is of course not helpful. Our purpose is to put the design through a series of pass/fail tests that will not allow any serious defects to hide.
It’s also important not to give the test user any hints during this process. If the design is sufficiently unclear that the test user gets stuck, we need to let them get stuck. The whole point of the usability testing process is to uncover the weaknesses of the design that let the user get stuck. When this happens, it’s the record keeper’s job to make a note of where exactly the test user got stuck so that the defect can be addressed in the next round of design prototypes. Once the record keeper has made their note of the defect, the test user can be given a hint and allowed to continue, if possible.
When I started doing usability testing, I found to my surprise that my first attempt at the design was almost always unusable. The test user almost always got hopelessly stuck during the first meeting. It would usually take two or three rounds of prototyping before I arrived at a usable design.
Once the usability testing process is complete, the designs created during the usability testing process can be translated into written requirements.
Written requirements
If a stakeholder and a developer don’t have a shared vision of exactly what a feature is going to be when it’s complete, then they’re inviting trouble down the road when the software that gets built doesn’t match what’s expected. And it’s really hard to have a shared vision of exactly what a feature is going to be if there aren’t highly detailed written and/or graphical requirements.
The beauty of usability testing is that it kills ambiguity and logical inconsistency. If the ideas for the feature start off vague, they must be made concrete in order to be translated into design prototypes. If the ideas for the feature start of illogical, the logic failures will surface as defects and not survive the usability testing process.
Because usability testing goes so far toward clarifying requirements, often the designs that result from the usability testing process can just be translated into words and used along with the designs themselves as the feature’s specs. It’s not quite that simple though.
I’ve seen a lot of features fail to get completed within anything close to the time expected, including features I’ve worked on myself. Often the reason is that the feature was too big, or too vague, or both.
When translating designs to specs (“user stories” if you’re using agile development), it’s important not to make the user stories too big. I like to keep all my user stories small enough that they can be started, completed, tested, deployed and verified all in the same day. I’ve sometimes seen the mistake of teams working in one-week sprints where the stories inside the sprint are each expected to take one week. This is bad because it leaves no margin for error. And of course, stories that are expected to take a week often take two weeks or more. So these stories keep getting pushed from sprint to sprint, for several sprints in a row. When each story is only a day’s worth of work, this is not so much of a risk, even if the story takes several times as long as expected.
It’s also important for each user story to be crisply defined. My rule of thumb is that some outside person should be able to read the story’s description and understand exactly what steps they would need to perform in the application in order to verify that the story is done. The question of “How do we know when this feature is done?” should be abundantly clear.
In addition to each story having a clear definition of done, it’s also helpful if the team has a definition of done for stories in general. For example, is it considered done when it’s feature-complete or only when it’s deployed and verified to be working? (I prefer the latter definition myself.) Having an agreement like this helps prevent any ambiguity or disagreement as to whether any particular feature is really actually done.
Takeaways
Building the wrong thing is a common problem, but luckily, it’s a very fixable one. The key is to perform usability testing in order to sharply define the feature and then to document the feature’s requirements clearly and precisely so there’s little room for misunderstanding.
Not only will this way of working eliminate huge amounts of waste and frustration in the development process, it’s also a lot more fun.
The purpose of let and the differences between let and instance variables
RSpec’s let helper method is a way of defining values that are used in tests. Below is a typical example.
require 'rspec'

RSpec.describe User do
  let(:user) { User.new }

  it 'does not have an id when first instantiated' do
    expect(user.id).to be nil
  end
end
Another common way of setting values is to use instance variables in a before block like in the following example.
require 'rspec'

RSpec.describe User do
  before { @user = User.new }

  it 'does not have an id when first instantiated' do
    expect(@user.id).to be nil
  end
end
There are some differences between the let approach and the instance variable approach, with one in particular that’s quite significant.
Differences between let and instance variables
First, there’s the stylistic difference. The syntax is of course a little different between the two approaches. Instance variables are of course prefixed with @. Some people might prefer one syntax over the other. I personally find the let syntax ever so slightly tidier.
There are also a couple mechanical differences. Because of how instance variables work in Ruby, you can use an undefined instance variable and Ruby won’t complain. This presents a slight danger. You could for example accidentally pass some undefined instance variable to a method, meaning you’d really be passing nil as the argument. This means you might be testing something other than the behavior you meant to test. This danger is admittedly remote though. Nonetheless, the let helper defined not an instance variable but a new method (specifically, a memoized method—we’ll see more on this shortly), meaning that if you typo your method’s name, Ruby will most certainly complain, which is of course good.
The other mechanical difference is that let can create values that get evaluated lazily. I personally find this to be a dangerous and bad idea, which I’ll explain below, but it is a capability that the helper offers.
Perhaps the most important difference between let and instance variables is that instance variables, when set in a before block, can leak from one file to another. If for example an instance variable called @customer is set in “File A”, then “File B” can reference @customer and get the value that was set in File A. Obviously this is bad because we want our tests to be completely deterministic and independent of one another.
How let works and the difference between let and let!
How let works
I used to assume that let simply defines a new variable for me to use. Upon closer inspection, I learned that let is a method that returns a method. More specifically, let returns a memoized method, a method that only gets run once.
Since that’s perhaps kind of mind-bending, let’s take a closer look at what exactly this means.
An example method
Consider this method that 1) prints something and then 2) returns a value.
def my_name
  puts 'thinking about what my name is...'
  'Jason Swett'
end

puts my_name
When we run puts my_name, we see the string that gets printed (puts 'thinking about what my name is...') followed by the value that gets returned by the method (Jason Swett).
$ ruby my_name.rb
thinking about what my name is...
Jason Swett
Now let’s take a look at some let syntax that will create the same method.
require 'rspec'

describe 'my_name' do
  let(:my_name) do
    puts 'thinking about what my name is...'
    'Jason Swett'
  end

  it 'returns my name' do
    puts my_name
  end
end
When we run this test file and invoke the my_name method, the same exact thing happens: the method `puts`es some text and returns my name.
$ rspec my_name_spec.rb
thinking about what my name is...
Jason Swett
.

Finished in 0.00193 seconds (files took 0.08757 seconds to load)
1 example, 0 failures
Just to make it blatantly obvious and to prove that my_name is indeed a method call and not a variable reference, here’s a version of this file with parentheses after the method call.
require 'rspec'

describe 'my_name' do
  let(:my_name) do
    puts 'thinking about what my name is...'
    'Jason Swett'
  end

  it 'returns my name' do
    puts my_name() # this explicitly shows that my_name() is a method call
  end
end
Memoization
Here’s a version of the test that calls my_name twice. Even though the method gets called twice, it only actually gets evaluated once.
require 'rspec'

describe 'my_name' do
  let(:my_name) do
    puts 'thinking about what my name is...'
    'Jason Swett'
  end

  it 'returns my name' do
    puts my_name
    puts my_name
  end
end
If we run this test, we can see that the return value of my_name gets printed twice and the thinking about what my name is... part only gets printed once.
$ rspec my_name_spec.rb
thinking about what my name is...
Jason Swett
Jason Swett
.

Finished in 0.002 seconds (files took 0.08838 seconds to load)
1 example, 0 failures
The lazy evaluation of let vs. the immediate evaluation of let!
When we use let, the code inside our block gets evaluated lazily. In other words, none of the code inside the block gets evaluated until we actually call the method created by our let block.
Take a look at the following example.
require 'rspec'

describe 'let' do
  let(:message) do
    puts 'let block is running'
    'VALUE'
  end

  it 'does stuff' do
    puts 'start of example'
    puts message
    puts 'end of example'
  end
end
When we run this, we’ll see start of example first because the code inside our let block doesn’t get evaluated until we call the message method.
$ rspec let_example_spec.rb
start of example
let block is running
VALUE
end of example
.

Finished in 0.00233 seconds (files took 0.09836 seconds to load)
1 example, 0 failures
The “bang” version of let, let!, evaluates the contents of our block immediately, without waiting for the method to get called.
require 'rspec'

describe 'let!' do
  let!(:message) do
    puts 'let block is running'
    'VALUE'
  end

  it 'does stuff' do
    puts 'start of example'
    puts message
    puts 'end of example'
  end
end
When we run this version, we see let block is running appearing before start of example.
$ rspec let_example_spec.rb
let block is running
start of example
VALUE
end of example
.

Finished in 0.00224 seconds (files took 0.09131 seconds to load)
1 example, 0 failures
I always use let! instead of let. I’ve never encountered a situation where the lazily-evaluated version would be helpful but I have encountered situations where the lazily-evaluated version would be subtly confusing (e.g. a let block is saving a record to the database but it’s not abundantly clear exactly at what point in the execution sequence the record gets saved). Perhaps there’s some performance benefit to allowing the lazy evaluation but in most cases it’s probably negligible. Confusion is often more expensive than slowness anyway.
Takeaways
The biggest advantage to using let over instance variables is that instance variables can leak from test to test, which isn’t true of let.
The difference between let and let! is that the former is lazily evaluated while the latter is immediately evaluated.
I always use the let! version because I find the execution path to be more easily understandable.
As a system grows, constant refactoring is needed in order to keep the code understandable.
There are four possible times to perform any piece of refactoring.
During a change
Independently of changes
After a change
Before a change
Some of these times to perform refactorings are good and some are less good. Let’s evaluate each of these times.
Evaluating the various times to refactor
Refactoring during a change
Of the four possible times to refactor, refactoring during a change is the worst time to do it. The reason is because when you look back at the changes you made, you have no easy way to see what’s a behavior change and what’s a refactoring. If you introduce a bug during your work, you won’t know if the bug came from the behavior change or a mistake in your refactoring. It also makes pull requests harder to review.
Mixing refactoring with behavior changes also creates problems around version control. If you discover later that your commit introduced a bug and you need to roll back the commit, you’ll be forced to roll back both the refactoring and the behavior change, even if only one of the two is problematic and the other one is fine. Mixing refactoring with behavior changes also makes it hard to pinpoint bugs using git bisect.
Independently of changes
Performing refactoring independently of changes is an okay time to do it but it’s not my favorite. Bad code only costs something if and when that code needs to be worked with. Having bad code sitting in your codebase is kind of like having a dull saw sitting in your garage. Sharp saws are better than dull saws, but dull saws don’t cause problems until you actually have to use them. Better in my opinion to sharpen a saw either right before or right after you use it, since that way you can be more sure your sharpening is worthwhile because you’re sharpening a saw that you know gets used.
After a change
Refactoring code right after a change is a great time to do it. For anything but the smallest changes, it’s basically impossible to write good code on the first try. Sometimes a change triggers small, local refactorings. Sometimes a change alters the story of the codebase enough that a broad refactoring scattered across the whole application is called for.
One downside to refactoring after a change is that it can be hard to tell exactly what needs refactoring. If you’re refactoring something you wrote five minutes ago, then you’re not a very good simulation of a future maintainer who has to look at your code for the first time and try to understand it. For this reason I don’t refactor my code to an obsessive degree when I’m performing refactorings right after a change because I know that my idea of what’s “best” is likely to be wrong at this point in time. I’ll probably have a better idea of how to clearly express the code after I’ve had some time to forget what it does so that the gaps between what the code does and how well the code explains what it does are more obvious.
Before a change
Refactoring before a change is also a great time to do it. As mentioned above, it’s often better to refactor a piece of code you don’t understand than a piece of code you do understand, because if you don’t understand the code, then you have a stronger need for the code to clearly explain to you what it does. If you understand a piece of code throughly then the code might seem clear enough even when it’s not.
Another reason that refactoring before a change is a good idea is that you know for sure that your refactoring is going to be helpful. In fact, you may well discover that the change you want to make is basically impossible without some refactoring first.
A metaphor to remember this by
The Boy Scout Rule, “leave the campground cleaner than you found it”, is a popular rule among programmers, but I think the Boy Scout Rule too easily misinterpreted. In what way exactly are you supposed to leave the campground cleaner than you found it?
I prefer a kitchen metaphor. I think “clean the kitchen before you make dinner” and “clean the kitchen after you make dinner” make pretty good metaphors for refactoring before and after a change. Obviously it’s more annoying and time-consuming to try to cook dinner in a kitchen full of dirty dishes than a clean one. And if you clean the kitchen after you make dinner, it just makes it that much faster and easier to make dinner next time because there will be less cleaning.
Takeaways
Don’t mix refactoring with behavior changes. The best time to do refactoring is either right before or right after a change.
Blocks are a fundamental concept in Ruby. Many common Ruby methods use blocks. Blocks are also an integral part of many domain-specific languages (DSLs) in libraries like RSpec, Factory Bot, and Rails itself.
In this post we’ll discuss what a block is. Then we’ll take a look at four different native Ruby methods that take blocks (times, each, map and tap) in order to better understand what use cases blocks are good for.
Lastly, we’ll see how to define our own custom method that takes a block.
What a block is
Virtually all languages have a way for functions to take arguments. You pass data into a function and then the function does something with that data.
A block takes that idea to a new level. A block is a way of passing behavior rather than data to a method. The examples that follow will illustrate exactly what is meant by this.
Native Ruby methods that take blocks
Here are four native Ruby methods that take blocks. For each one I’ll give a description of the method, show an example of the method being used, and then show the output that that example would generate.
Remember that blocks are a way to pass behavior rather than data into methods. In each description, I’ll use the phrase “Behavior X” to describe the behavior that might be passed to the method.
Method: times
Description: “However many times I specify, repeat Behavior X.”
Example: three times, print the text “hello”. (Behavior X is printing “hello”.)
3.times do
  puts "hello"
end
Output:
hello
hello
hello
Method: each
“Take this array. For each element in the array, execute Behavior X.”
Example: iterate over an array containing three elements and print each element. (Behavior X is printing the element.)
[1, 2, 3].each do |n|
  puts n
end
Output:
1
2
3
Method: map
“Take this array. For each element in the array, execute Behavior X, append the return value of X to a new array, and then after all the iterations are complete, return the newly-created array.”
Example: iterate over an array and square each element. (Behavior X is squaring the element.)
squares = [1, 2, 3].map do |n|
  n * n
end

puts squares.join(",")
Output:
1,4,9
Method: tap
“See this value? Perform Behavior X and then return that value.”
Example: initialize a file, write some content to it, then return the original file. (Behavior X is writing to the file.)
require "tempfile"

file = Tempfile.new.tap do |f|
  f.write("hello world")
  f.rewind
end

puts file.read
Output:
hello world
Now let’s look at how we can write our own method that can take a block.
Custom methods that take blocks
An HTML generator
Here’s a method which we can give an HTML tag as well as a piece of behavior. The method will execute our behavior. Before and after the behavior will be the opening and closing HTML tags.
inside_tag("p") do
  puts "Hello"
  puts "How are you?"
end
The output of this code looks like this.
<p>
Hello
How are you?
</p>
In this example, the “Behavior X” that we’re passing to our method is printing the text “Hello” and then “How are you?”.
The method definition
Here’s what the definition of such a method might look like.
def inside_tag(tag, &block)
  puts "<#{tag}>"  # output the opening tag
  block.call       # call the block that we were passed
  puts "</#{tag}>" # output the closing tag
end
Adding an argument to the block
Blocks can get more interesting when add arguments.
In the below example, the inside_tag block now passes an instance of Tag back to the block, allowing the behavior in the block to call tag.content rather than just puts. This allows our content to be indented.
class Tag
  def content(value)
    puts "  #{value}"
  end
end

def inside_tag(tag, &block)
  puts "<#{tag}>"
  block.call(Tag.new)
  puts "</#{tag}>"
end

inside_tag("p") do |tag|
  tag.content "Hello"
  tag.content "How are you?"
end
The above code gives the following output.
<p>
  Hello
  How are you?
</p>
Passing an object back to a block is a common DSL technique used in libraries like RSpec, Factory Bot, and Rails itself.
The technical details of blocks
There are a lot of technical details to learn about blocks. There are some interesting questions you could ask about blocks, including the following:
These are all good questions worth knowing the answer to, and you can click the links above to find out. But understanding these details is not necessary in order to understand the high-level gist of blocks.
Takeaway
A block is a way of passing behavior rather than data to a method. Not only do native Ruby methods make liberal use of blocks, but so do many popular Ruby libraries. Custom methods that take blocks can also sometimes be a good way to add expressiveness to your own applications.
I had to hear Docker explained many times before I finally grasped why it’s useful.
I’ll explain in my own words why I think Dockerizing my applications is something worth exploring. There are two benefits that I recognize: one for the development environment and one for the production environment.
Development environment benefits
When a new developer joins a team, that developer has to get set up with the team’s codebase(s) and get a development environment running. This can often be time-consuming and tedious. I’ve had experiences where getting a dev environment set up takes multiple days. If an application is Dockerized, spinning up a dev environment can be as simple as running a single command.
In addition to simplifying the setup of a development environment, Docker can simplify the running of a development environment. For example, in addition to running the Rails server, my application also needs to run Redis and Sidekiq. These services are listed in my Procfile.dev file, but you have to know that file is there, and you need to know to start the app using foreman start -f Procfile.dev. With Docker you can tell it what services you need to run and Docker will just run the services for you.
Production environment benefits
There are a lot of different ways to deploy an application to production. None of them is particularly simple. As of this writing, my main production application is deployed to AWS using Ansible for infrastructure management. This is nice in many ways but it’s also somewhat duplicative. I’m using one (currently manual) way to set up my development environment and then another (codified, using Ansible) ways to set up my production environment.
Docker allows me to set up both my development environment and production environment the same way, or at least close to the same way. Once I have my application Dockerized I can use a tool like Kubernetes to deploy my application to any cloud provider without having to do a large amount of unique infrastructure configuration myself the way I currently am with Ansible. (At least that’s my understanding. I’m not at the stage of actually running my application in production with Docker yet.)
What we’ll be doing in this tutorial
In this tutorial we’ll be Dockerizing a Rails application using Docker and a tool called Docker Compose.
The Dockerization we’ll be doing will be the kind that will give us a development environment. Dockerizing a Rails app for use in production hosting will be a separate later tutorial.
My aim for this tutorial is to cover the simplest possible example of Dockerizing a Rails application. What you’ll get as a result is unfortunately not robust enough to be usable as a development environment as-is, but will hopefully serve as a good exercise to build your Docker confidence and to serve as a good jumping-off point for creating a more robust Docker configuration.
In this example our Rails application will have a PostgreSQL database and no other external dependencies. No Redis, no Sidekiq. Just a database.
Prerequisites
I’m assuming that before you begin this tutorial you have both Docker and Docker Compose installed. I’m assuming you’re using a Mac. Nothing else is required.
If you’ve never Dockerized anything before, I’d recommend that you check out my other post, How to Dockerize a Sinatra application, before digging into this one. The other post is simpler because there’s less stuff involved.
Fundamental Docker concepts
Let’s say I have a tiny Dockerized Ruby (not Rails, just Ruby) application. How did the application get Dockerized, and what does it mean for it to be Dockerized?
I’ll answer this question by walking sequentially through the concepts we’d make use of during the process of Dockerizing the application.
Images
When I run a Dockerized application, I’m running it from an image. An image is kind of like a blueprint for an application. The image doesn’t actually do anything, it’s just a definition.
If I wanted to Dockerize a Ruby application, I might create an image that says “I want to use Ruby 2.7.1, I have such-and-such application files, and I use such-and-such command to start my application”. I specify all these things in a particular way inside a Dockerfile, which I then use to build my Docker image.
Using the image, I’d be able to run my Dockerized application. The application would run inside a container.
Containers
Images are persistent. Once I create an image, it’s there on my computer (findable using the docker images command) until I delete it.
Containers are more ephemeral. When I use the docker run command to run an image, part of what happens is that I get a container. (Containers can be listed using docker container ls.) The container will exist for a while and then, when I kill my docker run process, the container will go away.
The difference between Docker and Docker Compose
One of the things that confused me in other Rails + Docker tutorials was the usage of Docker Compose. What is Docker Compose? Why do we need to use it in order to Dockerize Rails?
Docker Compose is a tool that lets you Dockerize an application that’s composed of multiple containers.
When in this example we Dockerize a Rails application that uses PostgreSQL, we can’t use just one image/container for that. We have to have one container for Rails and one container for PostgreSQL. Docker Compose lets us say “hey, my application has a Rails container AND a PostgreSQL container” and it lets us say how our various containers need to talk to each other.
The files involved in Dockerizing our application
Our Dockerized Rails application will have two containers: one for Rails and one for PostgreSQL. The PostgreSQL container can mostly be grabbed off the shelf using a base image. Since certain container needs are really common—e.g. a container for Python, a container for MySQL, etc.—Docker provides images for these things that we can grab and use in our application.
For our PostgreSQL need, we’ll grab the PostgreSQL 11.5 image from Docker Hub. Not much more than that is necessary for our PostgreSQL container.
Our Rails container is a little more involved. For that one we’ll use a Ruby 2.7.1 image plus our own Dockerfile that describes the Rails application’s dependencies.
All in all, Dockerizing our Rails application will involve two major files and one minor one. An explanation of each follows.
Dockerfile
The first file we’ll need is a Dockerfile which describes the configuration for our Rails application. The Dockerfile will basically say “use this version of Ruby, put the code in this particular place, install the gems using Bundler, install the JavaScript dependencies using Yarn, and run the application using this command”.
You’ll see the contents of the Dockerfile later in the tutorial.
docker-compose.yml
The docker-compose.yml file describes what our containers are and how they’re interrelated. Again, we’ll see the contents of this file shortly.
init.sql
This file plays a more minor role. In order for the PostgreSQL part of our application to function, we need a user with which to connect to the PostgreSQL instance. The only way to have a user is for us to create one. Docker allows us to have a file called init.sql which will execute once per container, ever. That is, the init.sql will run the first time we run our container and never again after that.
Dockerizing the application
Start from this repo called boats.
$ git clone git@github.com:jasonswett/boats.git
The master branch is un-Dockerized. You can start here and Dockerize the app yourself or you can switch to the docker branch which I’ve already Dockerized.
Dockerfile
Paste the following into a file called Dockerfile and put it right at the project root.
# Use the Ruby 2.7.1 image from Docker Hub
# as the base image (https://hub.docker.com/_/ruby)
FROM ruby:2.7.1

# Use a directory called /code in which to store
# this application's files. (The directory name
# is arbitrary and could have been anything.)
WORKDIR /code

# Copy all the application's files into the /code
# directory.
COPY . /code

# Run bundle install to install the Ruby dependencies.
RUN bundle install

# Install Yarn.
RUN curl -sS https://dl.yarnpkg.com/debian/pubkey.gpg | apt-key add -
RUN echo "deb https://dl.yarnpkg.com/debian/ stable main" | tee /etc/apt/sources.list.d/yarn.list
RUN apt-get update && apt-get install -y yarn

# Run yarn install to install JavaScript dependencies.
RUN yarn install --check-files

# Set "rails server -b 0.0.0.0" as the command to
# run when this container starts.
CMD ["rails", "server", "-b", "0.0.0.0"]
docker-compose.yml
Create another file called docker-compose.yml. Put this one at the project root as well.
# Use the file format compatible with Docker Compose 3.8
version: "3.8"

# Each thing that Docker Compose runs is referred to as
# a "service". In our case, our Rails application is one
# service ("web") and our PostgreSQL database instance
# is another service ("database").
services:

  database:
    # Use the postgres 11.5 base image for this container.
    image: postgres:11.5

    volumes:
      # We need to tell Docker where on the PostgreSQL
      # container we want to keep the PostgreSQL data.
      # In this case we're telling it to use a directory
      # called /var/lib/postgresql/data, although it
      # conceivably could have been something else.
      #
      # We're associating this directory with something
      # called a volume. (You can see all your Docker
      # volumes by running +docker volume ls+.) The name
      # of our volume is db_data.
      - db_data:/var/lib/postgresql/data

      # This copies our init.sql into our container, to
      # a special file called
      # /docker-entrypoint-initdb.d/init.sql. Anything
      # at this location will get executed one per
      # container, i.e. it will get executed the first
      # time the container is created but not again.
      #
      # The init.sql file is a one-line that creates a
      # user called (arbitrarily) boats_development.
      - ./init.sql:/docker-entrypoint-initdb.d/init.sql

  web:
    # The root directory from which we're building.
    build: .

    # This makes it so any code changes inside the project
    # directory get synced with Docker. Without this line,
    # we'd have to restart the container every time we
    # changed a file.
    volumes:
      - .:/code:cached

    # The command to be run when we run "docker-compose up".
    command: bash -c "rm -f tmp/pids/server.pid && bundle exec rails s -p 3000 -b '0.0.0.0'"

    # Expose port 3000.
    ports:
      - "3000:3000"

    # Specify that this container depends on the other
    # container which we've called "database".
    depends_on:
      - database

    # Specify the values of the environment variables
    # used in this container.
    environment:
      RAILS_ENV: development
      DATABASE_NAME: boats_development
      DATABASE_USER: boats_development
      DATABASE_PASSWORD:
      DATABASE_HOST: database

# Declare the volumes that our application uses.
volumes:
  db_data:
init.sql
This one-liner is our third and final Docker-related file to add. It will create a PostgreSQL user for us called boats_development. Like the other two files, this one can also go at the project root.
CREATE USER boats_development SUPERUSER;
config/database.yml
We’re done adding our Docker files but we still need to make one change to the Rails application itself. We need to modify the Rails app’s database configuration so that it knows it needs to be pointed at a PostgreSQL instance running in the container called database, not the same container the Rails app is running in.
Run the following command to build the application we’ve just described in our configuration files.
$ docker-compose build
Once that has successfully completed, run docker-compose up to run our application’s containers.
$ docker-compose up
The very last step before we can see our Rails application in action is to create the database, just like we would if we were running a Rails app without Docker.
$ docker-compose run web rails db:create
$ docker-compose run web rails db:migrate
The docker-compose run command is what we use to run commands inside a container. Running docker-compose run web means “run this command in the container called web“.
Finally, open http://localhost:3000 to see your Dockerized Rails application running in the browser.
$ open http://localhost:3000
Congratulations. You now have a Dockerized Rails application.
If you followed this tutorial and it didn’t work for you, please leave a comment with your problem, and if I can, I’ll help troubleshoot. Good luck.
In my experience, Dockerizing a Rails application for the first time is pretty hard. Actually, doing anything with Docker seems pretty hard. The documentation isn’t that good. Clear examples are hard to find.
Dockerizing Rails is too ambitious as a first goal
Whenever I do anything for the first time, I want to do the simplest, easiest possible version of that thing before I try anything more complicated. I also never want to try to learn more than one thing at once.
If I try to Dockerize a Rails application without any prior Docker experience, then I’m trying to learn the particulars of Dockerizing a Rails application while also learning the general principles of Docker at the same time. This isn’t a great way to go.
Dockerizing a Sinatra application gives us practice
Dockerizing a Sinatra application lets us learn some of the principles of Docker, and lets us get a small Docker win under our belt, without having to confront all the complications of Dockerizing a Rails application. (Sinatra is a very simple Ruby web application framework.)
After we Dockerize our Sinatra application we’ll have a little more confidence and a little more understanding than we did before. This confidence and understanding will be useful when we go to try to Dockerize a Rails application (which will be a future post).
By the way, if you’ve never worked with Sinatra before, don’t worry. No prior Sinatra experience is necessary.
What we’re going to do
Here’s what we’re going to do:
Create a Sinatra application
Run the Sinatra application to make sure it works
Dockerize the Sinatra application
Run the Sinatra application using Docker
Shotgun a beer in celebration (optional)
I’m assuming you’re on a Mac and that you already have Docker installed. If you don’t want to copy/paste everything, I have a repo of all the files here.
Our Sinatra “application” will have just one file. The application will have just one endpoint. Create a file called hello.rb with the following content.
# hello.rb

require 'sinatra'

get '/' do
  'It works!'
end
We’ll also need to create a Gemfile that says Sinatra is a dependency.
Lastly for the Sinatra application, we’ll need to add the rackup file, config.ru.
# config.ru

require './hello'

run Sinatra::Application
After we run bundle install to install the Sinatra gem, we can run the Sinatra application by running ruby hello.rb.
$ bundle install
$ ruby hello.rb
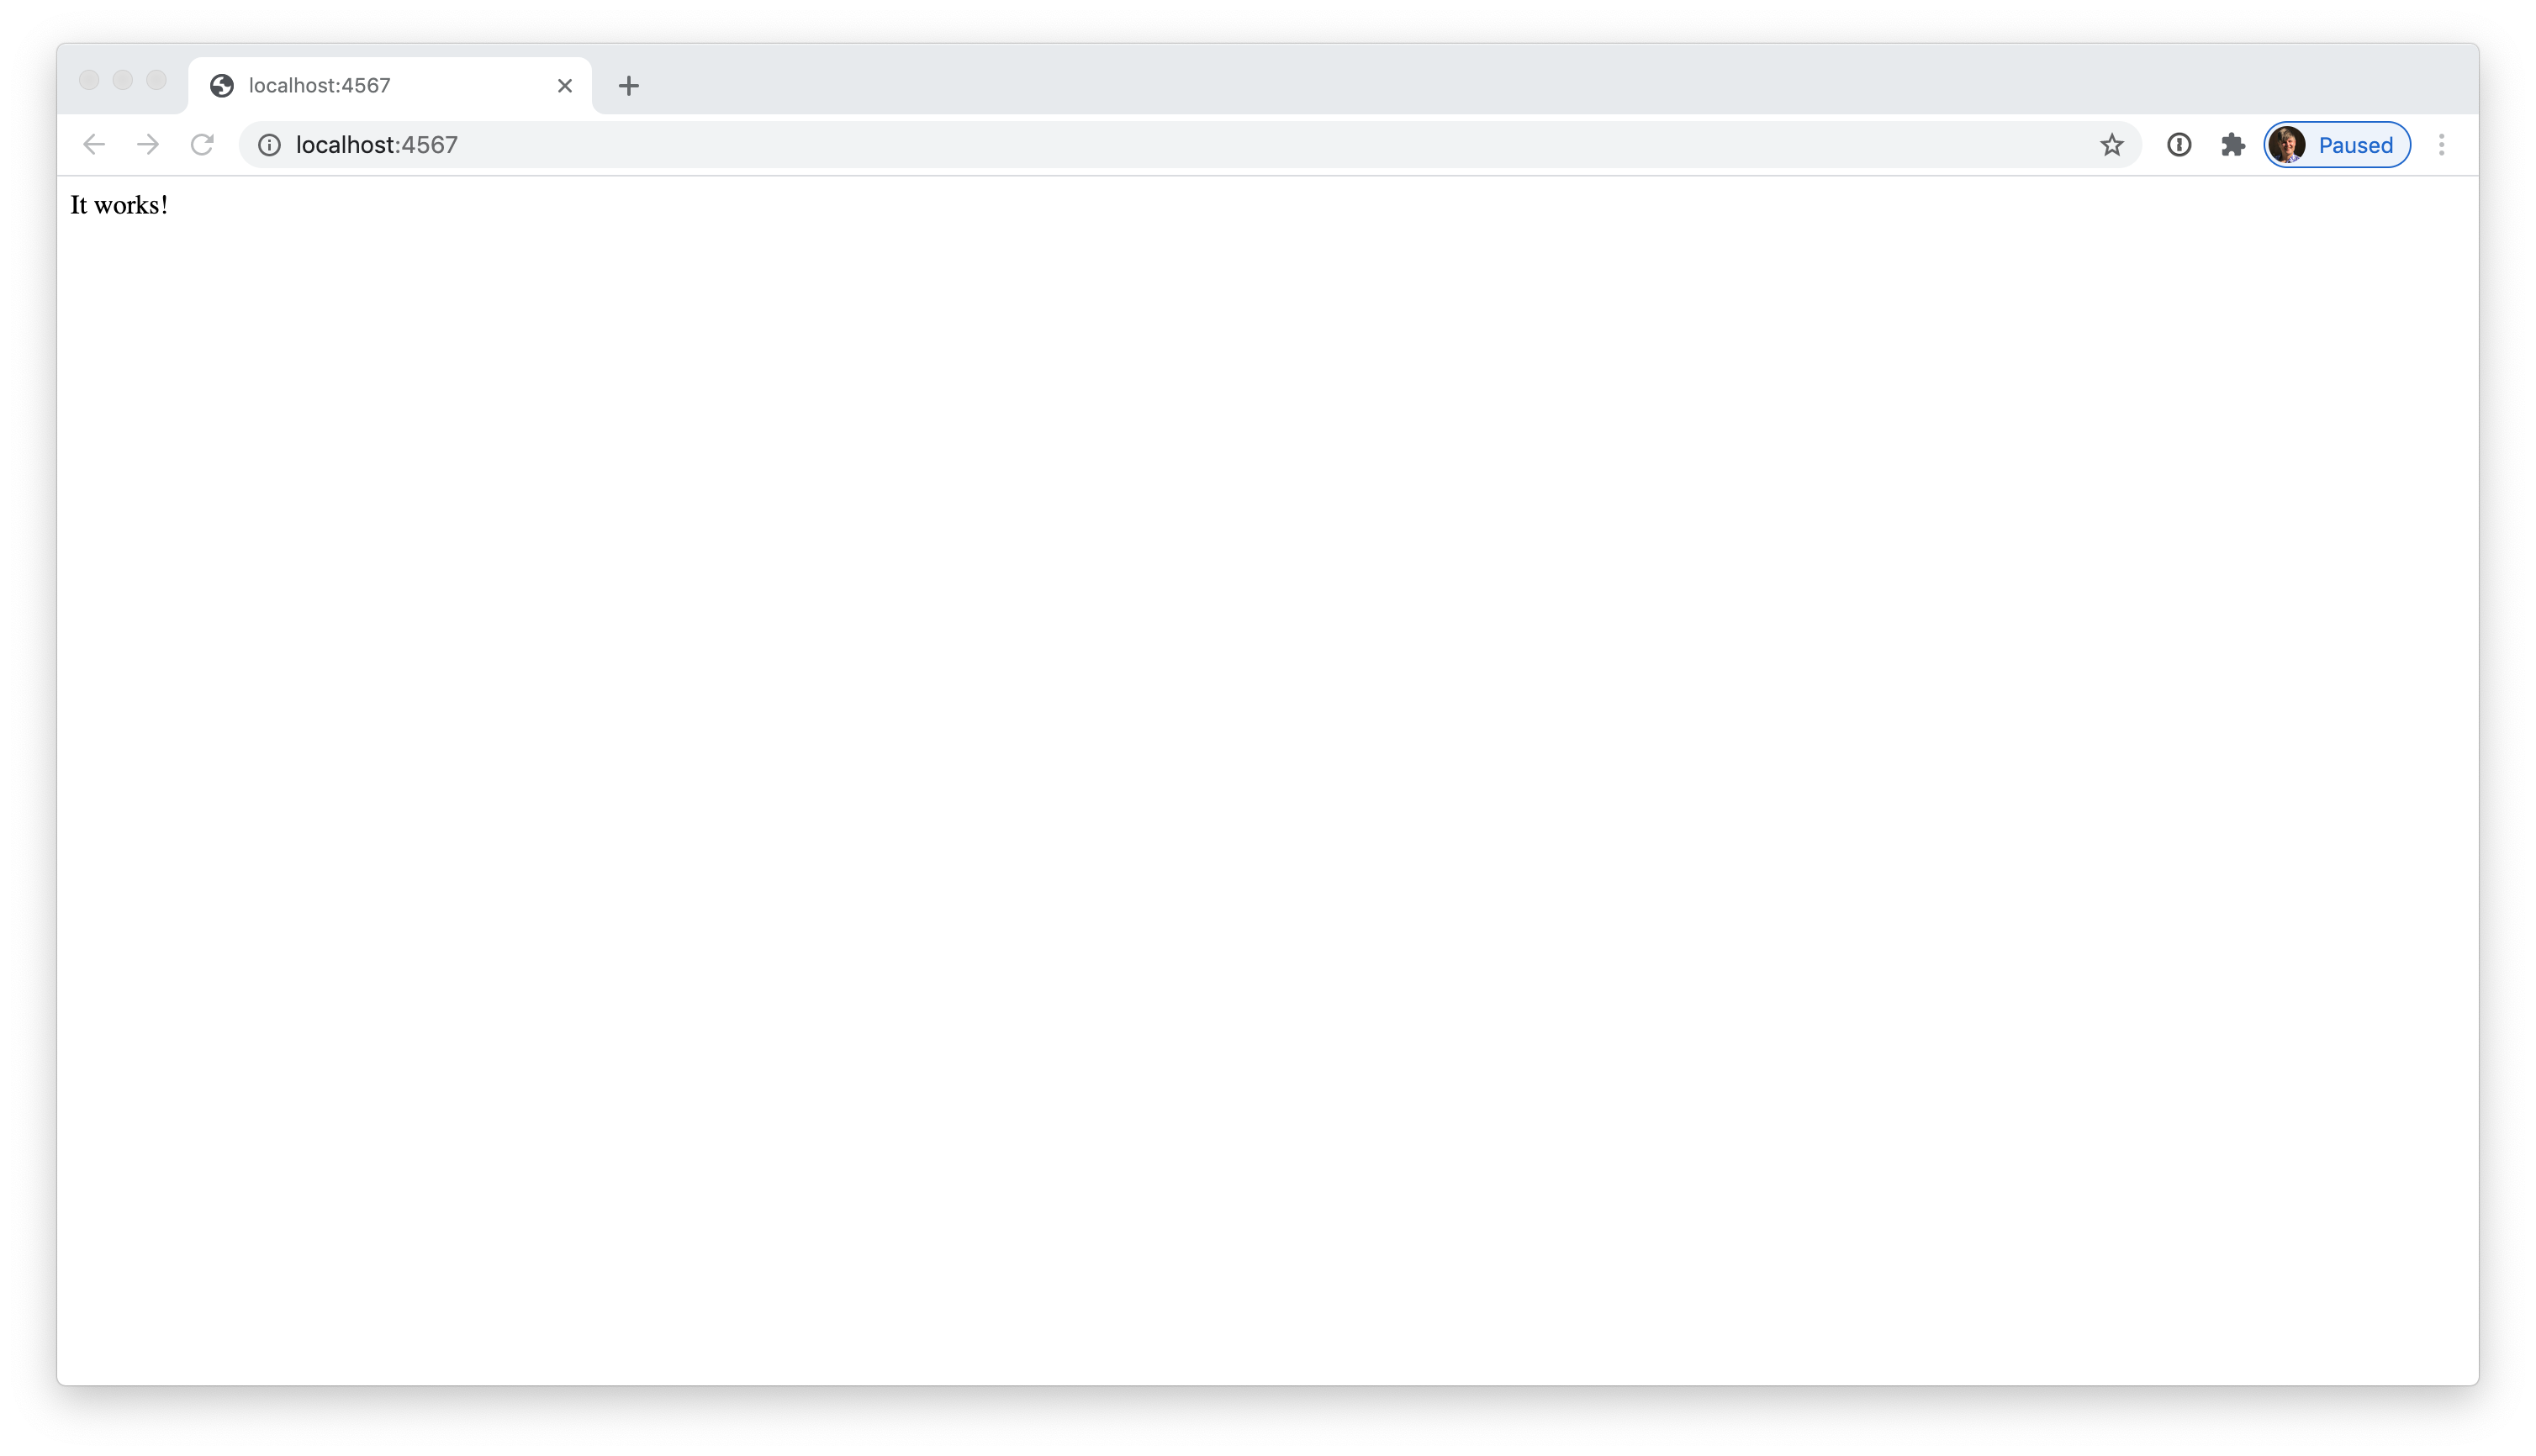
Sinatra apps run on port 4567 by default, so let’s open up http://localhost:4567 in a browser.
$ open http://localhost:4567
If everything works properly, you should see the following.
Dockerizing the Sinatra application
Dockerizing the Sinatra application will involve two steps. First, we’ll create a Dockerfile will tells Docker how to package up the application. Next we’ll use our Dockerfile to build a Docker image of our Sinatra application.
Creating the Dockerfile
Here’s what our Dockerfile looks like. You can put this file right at the root of the project alongside the Sinatra application files.
Since it might not be clear what each part of this file does, here’s an annotated version.
# Dockerfile

# Include the Ruby base image (https://hub.docker.com/_/ruby)
# in the image for this application, version 2.7.4.
FROM ruby:2.7.4

# Put all this application's files in a directory called /code.
# This directory name is arbitrary and could be anything.
WORKDIR /code
COPY . /code

# Run this command. RUN can be used to run anything. In our
# case we're using it to install our dependencies.
RUN bundle install

# Tell Docker to listen on port 4567.
EXPOSE 4567

# Tell Docker that when we run "docker run", we want it to
# run the following command:
# $ bundle exec rackup --host 0.0.0.0 -p 4567.
CMD ["bundle", "exec", "rackup", "--host", "0.0.0.0", "-p", "4567"]
Building the Docker image
All we need to do to build the Docker image is to run the following command.
I’m choosing to tag this image as hello, although that’s an arbitrary choice that doesn’t connect with anything inside our Sinatra application. We could have tagged it with anything.
The . part of the command tells docker build that we’re targeting the current directory. In order to work, this command needs to be run at the project root.
$ docker build --tag hello .
Once the docker build command successfully completes, you should be able to run docker images and see the hello image listed.
Running the Docker image
To run the Docker image, we’ll run docker run. The -p 4567:4567 portion says “take whatever’s on port 4567 on the container and expose it on port 4567 on the host machine”.
$ docker run -p 4567:4567 hello
If we visit http://localhost:4567, we should see the Sinatra application being served.
$ open http://localhost:4567
Conclusion
Congratulations. You now have a Dockerized Ruby application!
With this experience behind you, you’ll be better equipped to Dockerize a Rails application the next time you try to take on that task.
It’s generally better to be right than to be wrong. Since there’s more than one way to be wrong, I want to be specific about the type of wrongness I want to address in this post before I move on.
The type of wrongness I’m interested in in this post is logical incorrectness, like two plus two equals five.
The danger of being wrong
Being right or wrong isn’t just an academic concern. In programming, being wrong often has concrete negative economic (and other) impacts. Developers who are often wrong will be much less efficient and burn up much more payroll cost and opportunity cost than developers who are wrong less often.
Being wrong is also not something that happens every great once in a while. Most humans are wrong about a whole bunch of stuff, a lot of the time, because that’s just human nature. Even really smart people are wrong about things a very nonzero amount of the time.
So I want to share some things we developers can do in order to be wrong less. But first let me share a concrete example of the kind of mistakenness I’m talking about.
An example of being wrong
Bug: an appointment goes missing
Let’s say I’m building some scheduling software. One of my users, Rachel, reports to me that yesterday she rescheduled someone’s appointment from July 1st at 10am to July 3rd at 10am. Today, Rachel looked at both the schedule for July 1st and July 3rd and the appointment isn’t present on either day. Apparently there’s a bug that removes appointments from the schedule when you try to reschedule them.
So I start to look at the code and see if I can find any evidence that this buggy behavior is present. Unfortunately, the code is very complicated, and my investigation takes a long time. My investigation lasts an entire day. By the end of the day I’ve made almost no progress toward fixing the bug.
The bug was not the bug
Unbeknownst to me, the thing I thought was the bug was not actually the bug. In fact, there was no bug. Between the time Rachel rescheduled the appointment and the time Rachel found the appointment missing, another user, Janice. deleted the appointment. There was in fact no bug at all. I was wrong. I wasted a whole day as a consequence of being wrong.
How to be less wrong
We developers can be wrong less of the time by studying epistemology. Epistemology is a branch of philosophy which deals with the acquisition of knowledge. Epistemology tells us how we can know, with certainty, what’s true and what isn’t.
More narrowly, we can study logic. Logic is a branch of philosophy that deals with a formal system of reasoning. One of the central ideas of logic is that of an argument. Arguments are the ideas we’ll be focusing on in this post.
The definition of a logical argument
An argument is a group of statements including one or more premises and one and only one conclusion. (I shamelessly stole this definition word-for-word from this web page.)
Now let’s talk about what a premise is and what a conclusion is. As an aid I’ll share an example of a logical argument, henceforth just referred to as an “argument”.
Argument example
All fish live in water.
All sharks are fish.
Therefore, all sharks live in water.
This argument contains two premises. “All fish live in water” is a premise. “All sharks are fish” is also a premise.
This argument’s conclusion is of course “Therefore, all sharks live in water”. If it’s true that all fish live in water and it’s true that all sharks are fish, then it’s of course true that all sharks live in water.
Validity and soundness
Not all arguments are good ones. An argument can be valid or invalid and sound or unsound.
Validity
An argument is valid if the truth of the argument’s conclusion is logically connected to the argument’s premises. Our above fish/shark argument is a valid argument because, if the argument’s premises are true, its conclusion must necessarily be true. We could make the argument invalid by changing some things.
All fish live in water.
All sharks are fish.
Therefore, all sharks have fins.
This argument isn’t valid because its conclusion doesn’t logically flow from its premises. It happens to be true that all sharks have fins, but that fact isn’t true as a natural consequence of this argument’s premises, so the argument isn’t valid.
Note that validity doesn’t have anything to do with truth. An argument can be valid even if its premises aren’t true.
All turtles are invisible.
Everyone has a turtle in their brain.
Therefore, everyone has an invisible turtle in their brain.
The premises of the above argument aren’t true (at least as far as I know) but the argument is nonetheless valid.
Soundness
An argument is sound if the argument is valid and its premises are true. Our first argument (“all fish live in water, all sharks are fish, therefore all sharks live in water”) is sound because the argument is valid and its premises are true. Sound arguments always have true conclusions.
Here’s another sound argument.
Every 20th century American president has been male.
Richard Nixon was a 20th century American president.
Richard Nixon was male.
Now comes the fun part, where we apply logical arguments to programming.
Arguments in programming
Read the following argument, keeping in mind the definitions of validity and soundness. See if you can tell if the argument is valid or invalid, sound or unsound. (If you don’t want a spoiler, don’t scroll past the argument until you’ve read the full argument.)
The site is unusually slow today.
We performed a large deployment this morning.
The deployment is the cause of the slowness.
This argument is unsound. Even if the premises are true, we can’t know based on the premises that the deployment was the cause of the slowness. How do we know it’s not a coincidence? For all we know, our site got featured on Hacker News and a big traffic spike is the cause of the slowness. Our argument is unsound because its conclusion isn’t necessarily true based on its premises. So, the reason that the argument is unsound is because even though its premises are true, its logic is invalid.
Here’s another example. Instead of just two premises, this argument has three.
Sometimes slowness is caused by code changes.
Sometimes slowness is caused by traffic spikes.
The site is unusually slow today.
The cause of the slowness is either a code change or a traffic spike.
This argument is also unsound. There are more possible reasons for a site to be slow than just a code change or a traffic spike. For example, maybe our DevOps person killed half the servers in the middle of the night last night without our knowing it. So despite true premises, this argument, like the preceding one, is invalid.
Here’s another example.
The code in the most recent deployment introduced a bug.
The only thing that went out in the most recent deployment was Josh’s code.
Josh’s code caused the bug.
As long as this argument’s premises are true, this argument is sound. If we know for sure that the most recent deployment introduced a bug, and we know for sure that the only thing that went out in the most recent deployment was Josh’s code, then it does logically follow that Josh’s code caused the bug.
Here’s a final example. This one is a little more detailed than the previous ones.
At 10:32am, a duplicate $20 charge appeared in the system for patient #5225.
Also at 10:32am, Jason carelessly performed a manual actual action on patient #5225, an action that was related to that patient’s $20 charge.
Jason caused the duplicate charge.
This is another unsound argument. Even though it sounds likely that my action caused the duplicate charge, it’s not logically valid to make that inference based on the premises. The invalidity is perhaps not obvious, but can be made more apparent by asking the question: “Are there any possible circumstances under which Jason’s manual action would NOT have created the duplicate charge?” For example, it’s possible that the card could have accidentally been run twice, and the timing was a coincidence.
I have empirical proof of the invalidity of the above argument because this is a real-life example and, in fact, my action was not the cause of the duplicate charge. Part of what helped me determine this is the following sound argument.
It’s impossible to create a charge without having a patient’s credit card information.
It would have been physically impossible for me to involve the patient’s credit card information when I performed my manual action because we don’t store credit card information in the system.
My action couldn’t have created the duplicate charge.
The preceding sound argument (and remember, sound arguments always have true conclusions) led me to investigate more deeply. What I ultimately discovered was that the patient’s card did in fact get run twice and the timing was just a coincidence. Why wasn’t it obvious from the outset that the patient’s card was run twice? Because we use Authorize.net as a payment gateway, and apparently sometimes the Authorize.net API returns a failure response even when the charge was successfully incurred, so from the perspective of our application there was only one charge that got successfully created, even though in reality there were two.
Good luck with your arguments
Next time you’re confronted with a programming mystery, I invite you to frame your mystery in terms of arguments. Write down your premises, and make sure to write down only premises that are true, otherwise your argument will be unsound. Then try to come up with a conclusion and make sure that your conclusion necessarily follows from your premises so that your argument is valid. If your argument is valid and sound, your conclusion will necessarily be true.
If you’d like to have an argument with me on Twitter, you can find me here.
One of the testing questions I commonly get is about Shoulda matchers. People ask if I use Shoulda matchers and if Shoulda matchers are a good idea.
I’ll share my thoughts on this. First I’ll explain what Shoulda is, then I’ll explain why I don’t use it.
What Shoulda is
If you’re unfamiliar with Shoulda matchers, the premise, from the GitHub description, is: “Shoulda Matchers provides RSpec- and Minitest-compatible one-liners to test common Rails functionality that, if written by hand, would be much longer, more complex, and error-prone.”
A few examples of specific Shoulda matchers are validates_presence_of (expects that a model attribute has a presence validator), have_many (expects that a has_many association exists), and redirect_to (expects that a redirection takes place).
I like the idea of a library that can clean up a lot of my repetitive test code. Unfortunately, Shoulda matchers only apply to the kinds of tests I would never write.
Test behavior, not implementation
To me it doesn’t make much sense to, for example, write a test that only checks for the presence of an Active Record association and doesn’t do anything else.
If I have an association, presumably that association exists in order to enable some piece of behavior, or else it would be pointless for the association to exist. For example, if a User class has_many :posts, then that association only makes sense if there’s some Post-related behavior.
So there are two possibilities in light of testing that the User class has_many :posts. One is that I write a test for both the association itself and the behavior enabled by the association, in which case the test for the association is redundant and adds no value. The other possibility is that I write a test only for the post association, but not for the post behavior, which wouldn’t make much sense because why wouldn’t I write a test for the post behavior?
To me it only makes sense in this example to write tests for the post behavior and write no tests directly for the association. The logic of this decision can be proved by imagining what would happen if the has_many :posts line were removed. Any tests for the post behavior would start failing because the behavior would be broken without the association line present.
Takeaway
Don’t test low-level implementations. It’s pointless. Test behavior instead.
Since Shoulda is only good for testing low-level implementations, I don’t recommend using it.