Author Archives: Jason Swett

How to run a PostgreSQL database in a Docker container

Why you would want to do this

There are two main reasons for Dockerizing an application: for production use and for development use.

When Dockerizing an application for development, sometimes you might want to package up every single thing in the development environment. For example, in a Rails app, you might want to run each of PostgreSQL, Redis, and Ruby/Rails inside containers.

The drawbacks of Dockerizing everything

But then again you might not want to do that. To continue with the Rails app example, it can be very slow to e.g. run your tests inside a Docker container every single time you want to run a test.

You may instead wish to run PostgreSQL and Redis inside containers but leave Rails out of it, and instead connect Rails to these various containerized components.

This particular blog post covers the most basic building block of the above scenario: running PostgreSQL inside of a Docker container. I’m not going to cover actually connecting an application to the database in this post. This post is not meant to give you a useful result, but rather to help you gain an understanding of this building block.

What we’re going to do

Here’s what we’re going to do:

  1. Create a Docker image that can run PostgreSQL
  2. Run a container based on that image
  3. Connect to the PostgreSQL instance running inside that container to verify that it’s working

Let’s get started.

Creating the image

The first step is to create a Dockerfile. Name this file Dockerfile and put it inside a fresh empty directory.

FROM library/postgres
COPY init.sql /docker-entrypoint-initdb.d/

The first line says to use the postres image from Docker Hub as our base image.

The second line says to take our init.sql file (shown below) and copy it into the special /docker-entrypoint-initdb.d/ directory. Anything inside the /docker-entrypoint-initdb.d/ directory will get run each time we start a container.

Here are the contents of init.sql, which should go right next to our Dockerfile.

CREATE USER docker_db_user;
CREATE DATABASE docker_db_user;
GRANT ALL PRIVILEGES ON DATABASE docker_db_user TO docker_db_user;

As you can see, this file contains SQL code that creates a user, creates a database, and then grants permissions to that user on the database. It’s necessary to do all this each time a container starts because a container doesn’t “remember” all this stuff from run to run. It starts as a blank slate each time.

Building the image

Now let’s build our image.

docker build .

Once this runs, we can run docker images to see the image we just created.

docker images

You should see something that looks like this:

REPOSITORY          TAG                 IMAGE ID            CREATED             SIZE
<none>              <none>              396bfb8e3373        7 minutes ago       314MB

Running the container

We can use the docker run command to run a container based on our image. There are a few arguments that need to be passed, which I’ve annotated below.

docker run \
  --name dev-postgres \             # the arbitrary name of the container we're starting
  -e POSTGRES_PASSWORD=mypassword \ # the arbitrary db superuser password, which must be set to something
  396bfb8e3373                      # the image ID from our previous docker build step

Connecting to the database

Finally, we can connect to the database to verify that it works.

docker exec --interactive dev-postgres psql -U docker_db_user

If running this command puts you inside the PostgreSQL CLI, you’re good!
Dissecting Factory Bot’s factory definition syntax

Mysterious syntax

If you’ve used Factory Bot at all, you’ve seen syntax like this:

FactoryBot.define do
  factory :user do
    first_name { 'John' }
    last_name { 'Smith' }
    email { 'john.smith@example.com' }
  end
end

When I was first getting started with Rails and I wasn’t very familiar with Ruby, I would look at these files and understand what’s going on conceptually but I would have no idea what’s going on syntactically.

Why I didn’t understand this code

There were three barriers to my understanding at that early stage of my Ruby experience:

  • Ruby’s optional parentheses feature, although it can help code be very expressive, can also make it hard for beginners to tell what’s what.
  • I didn’t understand Ruby blocks yet.
  • I didn’t know about dynamically-defined methods.

Let’s look at a modified example that will make some of the syntax clearer.

A modified factory definition example

Below is a version of the above factory definition that’s functionally equivalent but with two syntactical changes.

The first change is that I’ve included parentheses for all method calls. The second is that I’ve changed all block usages to do syntax instead of the shorthand {} syntax.

FactoryBot.define() do # define is a method
  factory(:user) do
    first_name do
      'John'
    end

    last_name do
      'Smith'
    end

    email do
      'john.smith@example.com'
    end
  end
end

You can see here that define and factory are each just methods. Each of the two methods takes a block. (If you’re not very comfortable with blocks yet, check out my post on understanding Ruby blocks.)

first_name, last_name and email are also methods that take blocks, speaking loosely. Before we can talk about those we need to talk about methods versus messages.

Methods and messages

When you call a method on an object, it can be said that you’re sending a message to that object. For example, when you call "5".to_i, you’re sending the message to_i to the object "5", which is of course a String.

In the above case, the message to_i also happens to be a method that’s defined on String. This doesn’t need to be the case though. We could send any message at all to String, String just might not necessarily respond to that particular message. That’s why we have the respond_to? method, to see what messages an object responds to.

The messages an object will respond to need not be limited to the methods that are defined on that object. An object author can use the method_missing method to allow an object to respond to any message that’s sent to it, and respond in any way that the object author chooses.

Factory definitions and messages

What’s likely happening with first_name, last_name and email is that Factory Bot is using method_missing to allow arbitrary messages to be sent, and if the message (e.g. the message of first_name) matches an attribute on the model that the factory is for, then Factory Bot uses the block passed with the message to set the value of that attribute.

Takeaways

  • Factory Bot’s factory definitions are made out of methods and blocks.
  • Adding parentheses to any piece of DSL code can often make the code clearer.
  • Ruby objects can be passed arbitrary messages, and objects can be designed to respond to those messages.

The purpose of private methods and when to use them

Certain concepts in programming seem to suffer from a poor understanding among many programmers. Private methods are one of those concepts. Mistaken and confused advice on this topic abounds online.

In this post I’ll attempt to clear up some misconceptions regarding private methods as well as give my own conception of what private methods are for and when to use them.

The wrong answers you’ll find online

Before I describe my conception of private methods, I’ll discuss some of the wrong answers you can easily find online in hopes of inoculating you against their wrongness.

Wrong answer: “private methods are for breaking up tasks into smaller parts”

As of this writing, if I google for “purpose of private methods” and click on the first result, the following Stack Overflow answer comes up highlighted:

Private methods are useful for breaking tasks up into smaller parts, or for preventing duplication of code which is needed often by other methods in a class, but should not be called outside of that class.

It can’t be said that the reason for the existence of private methods is to break up tasks into smaller parts or prevent duplication, because both those things can be achieved with public methods.

Except for the last part which says “should not be called outside of that class” (which we’ll get to shortly), this answer is wrong.

Wrong answer: “private methods are for removing duplication”

From the top answer on the second link on Google:

Private methods are typically used when several methods need to do the exact same work as part of their responsibility (like notifying external observers that the object has changed), or when a method is split in smaller steps for readability.

This is basically the same answer as the first, and it’s of course wrong for the same reason.

The real purpose of private methods

I’ve been making heavy use of private methods for years. To the best I’ve been able to determine, here’s why I do it.

  1. Private methods help reduce the size of an object’s API
  2. Private methods indicate what’s safe to refactor

Let me explain why each of these things is good.

Private methods help reduce the size of an object’s API

Complexity is the enemy of understandability. The simpler I can make my code, the easier it will be to understand, and therefore the cheaper my code will be to maintain.

Let’s imagine I have an object with 8 methods, all public. That means there are 8 different ways other parts of my program could potentially use my object, and 8 different ways that my object interfaces with rest of my program. All 8 of these interfacings are things I have to understand in order to understand my program.

You could loosely say that in the above scenario, I have an “understandability cost” of 8.

Now let’s imagine a different object which has only 2 public methods. It has some other methods too, but those are private. Now there are only two possible ways the rest of my program could use my object. This scenario has an “understandability cost” of 2.

I know that my “understandability cost” metric is silly and quite imprecise but I hope it illustrates the point. The smaller each object’s public API, the easier it will be to understand my object’s relationship with everything else.

Now let’s talk about refactoring.

Private methods indicate what’s safe to refactor

Every public method is susceptible to being called from some outside entity. If a method is being called from somewhere, I can’t delete the method or change its signature without also having to change every place where the method is called. The only thing I can do is refactor its contents.

Since private methods can’t be called outside the same class (not without some irresponsible hackery at least), I know that I’m free to refactor as much as I want and I won’t inadvertently break any outside code. It’s true that other parts of the same object might call my private methods and thus be affected by my refactorings, but it’s valuable to know that I won’t have to look any farther than that.

Private methods aren’t a code smell

If you google around about private methods for more than about 30 seconds, you’ll find a number of posts exploring the question of whether private methods are a code smell.

Don’t buy it. The arguments that private methods are a code smell fall apart under the least bit of scrutiny. Every argument I’ve seen applies equally to public methods.

Here are the arguments I’ve seen:

  • Private methods indicate that the class is doing too many things (Single Responsibility Principle violation)
  • Private methods have too many dependencies because they directly access or modify internal state

Both the above arguments could apply just as much to public methods. Public methods could indicate the class is doing too many things. Public methods can access internal state just like private methods.

When to use private methods

My rule for when to use private methods is very simple. If it can be private, it is private. In other words, I make all methods private by default, and only make them public if they need to be in order for my program to work.

Testing private methods

I wrote a whole separate blog post about testing private methods. The common question is: “should private methods be tested”?

My answer is yes, private methods should be tested, but only indirectly through their public methods.

In order for the public/private idea to work, private methods have to be private from all outside code, including test code. When tests directly call private methods, the private methods can’t be refactoring without also changing the tests, throwing away one of the main benefits of testing: the ability to refactor with confidence.

Takeaways

The two benefits of private methods are that they a) help reduce the size of an object’s API and b) indicate what’s safe to refactor.

Private methods aren’t a code smell.

If a method can be made private, it should be made private. Making a method public when it doesn’t need to be brings no advantage and only creates a liability.

Do test private methods, but only indirectly through their public interfaces.

Should I be doing test-driven development?

When I see questions from beginners regarding learning testing, sometimes they seem to conflate testing with test-driven development (TDD). People will say “I have such-and-such question about TDD” but really it’s just a question about testing, nothing to do with TDD specifically.

Other people sometimes ask questions about whether TDD is “better” than writing tests after.

In this post I’ll try to clarify what’s TDD and what’s not. I’ll also explain whether I think it makes sense for testing beginners to try to practice TDD.

Testing != TDD

First of all, at the risk of stating the obvious, testing and TDD aren’t the same thing. TDD is a specific kind of testing practice where you write the tests before you write the code that makes the test pass. (If you want to go deeper into TDD, I highly recommend Kent Beck’s Test Driven Development: By Example.)

Learning vs. incorporating

Another mistake beginners sometimes make is to conflate learning testing with incorporating testing as a habitual part of their development workflow. They feel like they need to start adopting testing practices into their workflow from day one, and if they fail to do that, then they’ve failed at learning testing.

I think it’s more productive to separate the jobs of learning testing and applying testing. It’s not like skiing, where you learn it and do it at the same time. It’s more like basketball, where you practice free throws in your driveway and build some skills that way before you try to play a real game in front of an audience. You’ll get farther in the beginning if you separate the practice from the application of what you’ve learned to production tests. When you get comfortable enough, you can take off the training wheels and get all your practice from writing production tests.

TDD is beneficial but optional

TDD is super helpful in certain scenarios but it’s not something you absolutely need to learn when you’re first learning testing. I think it’s completely appropriate to first learn the fundamentals of testing in general, and then start to learn TDD once you’ve developed a decent level of comfort with testing.

I don’t always practice TDD

I’m not an advocate of practicing TDD 100% of the time in Rails, even for experienced testers. The reason is that when I’m building a new feature, I often have little idea what shape that feature will take, and the most realistic way for me to hammer it into shape is to just start building it. Once I’ve built some of the feature, then I’ll start adding tests. So, a portion of the time, I write my tests after writing my application code.

The place where I find TDD most useful is for model code. I practice TDD in my models a high percentage of the time. Once I’ve put the broad strokes of a feature in place, I’ll usually use TDD to work out the fine-grained aspects of it.

Takeaways

  • Testing and test-driven development aren’t the same thing.
  • When you’re first learning testing, it can be helpful to separate learning testing from applying testing.
  • You don’t need to learn TDD when you’re starting out.
  • I don’t always practice TDD or even advocate practicing TDD 100% of the time. I myself practice TDD maybe 60% of the time.

How do I add tests to an existing Rails project?

One of the most common questions asked by developers new to Rails testing is “How do I add tests to an existing Rails project?”

The answer largely depends on your experience level with testing. Here are my answers based on whether you have little testing experience or if you’re already decently comfortable with testing.

If you have little testing experience

If you have little testing experience, I would suggest getting some practice on a fresh Rails app before trying to introduce testing to the existing Rails project you want to add tests to.

Adding tests to an existing project is a distinct skill from writing tests for new projects. Adding tests to an existing project can be difficult even for very experienced testers, for reasons described below.

At the same time, you probably don’t want to wait a year to learn testing before you start enjoying the benefits of testing on your existing Rails app. What I would suggest is to first start a fresh throwaway Rails app for the purpose of learning testing. Then, once you’ve gotten a little experience there, see if you can apply something to your existing Rails app. Then, if things get too hard in the existing app, switch back to the throwaway app so you can strengthen your skills more. Continue switching back and forth until you don’t need to anymore.

If you’re already comfortable with testing

Here’s how I suggest adding tests to an existing Rails project: 1) develop a shared vision with your team, 2) start with what’s easiest, then 3) expand your test coverage.

Develop a shared vision

Going from no tests to decent test coverage is unfortunately not as simple as just deciding one day that from now on we’re going to write tests.

The team maintaining the codebase needs to decide certain things, like what testing tools they’re going to use and what testing approach they’re going to use.

In other words, if the team wants to go from point A to point B, they have to decide exactly where point B is and how they intend to try to get there.

Start with what’s easiest

When adding tests to a codebase that has few or no tests, it might seem logical to start by adding tests where tests would be most valuable. Or it might seem logical to require all new changes to have tests. Unfortunately, both these ideas have problems.

The features in an application that are most valuable are also likely to be among the most non-trivial. This means that tests for these features will probably be relatively hard to write due to the large amount of setup data needed. Code written without testability in mind can also be difficult to test due to entangled dependencies.

Requiring all new changes to have tests also has problems. New changes aren’t usually independent of existing code. They’re usually quite tangled up. This brings us back to the same problem we’d have adding tests to our most important features: the setup and dependencies make adding tests difficult, sometimes prohibitively so.

What I would do instead is start with what’s easiest. I would look for the simplest CRUD interfaces in the app and add some tests there, even if those particular tests didn’t seem to add much value. The idea isn’t to add valuable tests right from the start but to establish a beachhead that can be expanded upon.

Expand

Once you have a handful of tests for trivial features, you can add tests for increasingly complicated features. This will give you a much better shot at ending up with good test coverage than trying to start with the most valuable features or trying to add tests for all new changes.

The mechanical details

If your existing Rails application doesn’t have any testing infrastructure, I would suggest taking a look at my how I set up a Rails application post. (Remember that it’s possible to apply an application template to an existing project.)

As you add tests to your project starting with the most trivial features, I would suggest starting with system specs as opposed to model specs or any other type of specs. The reason is that system specs are often more straightforward to conceive of and understand. If you’d like a formula you can apply to add system specs to almost any CRUD feature, you can find that here.

Then, as you get deeper into adding tests to your application, I would suggest two resources: Working Effectively with Legacy Code by Michael Feathers and my post about using tests as a tool to wrangle legacy projects. You might not consider your project a legacy project, but the techniques will be useful anyway.

What are all the Rails testing tools and how do I use them?

One of the most common questions for Rails developers new to testing is “What are all the Rails testing tools and how do I use them?”

I’ll explain what the major tools are but I want to preface it by saying that the most important thing to learn to be a successful tester is testing principles, not testing tools. If you think of testing like a taco, the tools are the tortilla and the principles are the stuff inside the taco. The tortilla is essential but it’s really only a vehicle.

The following are the tools I use for my testing.

RSpec

RSpec is a test framework. A test framework is what gives us a structure for writing our tests as well as the ability to run our tests.

There are other test frameworks but RSpec is the most popular one for commercial Rails projects. The second most popular test framework is Minitest.

Test frameworks differ syntactically but the testing principles and practices are going to be pretty much the same no matter what framework you’re using. (If you’re not sure whether you should learn RSpec or Minitest, I write about that here.)

Factory Bot

One of the challenges of Rails testing is generating test data. For example, if you’re writing a test that logs a user in and then takes some action, you’re going to have to create a user in the database at the beginning of the test. Many tests require much more complicated test data setup.

There are two common ways of generating test data in Rails tests: fixtures and factories.

Fixtures

Fixtures typically take the form of one or more YAML files with some hard-coded data. The data is translated into database records one time, before any of the tests are run, and then deleted afterward. (This happens in a separate test database instance of course.)

Factories

With factories, database data is generated specifically for each test. Instead of loading all the data once at the beginning and deleting it at the end, data is inserted before each test case and then deleted before the next test case starts. (More precisely, the data isn’t deleted, but rather the test is run inside a database transaction and the data is never committed in the first place, but that’s a mechanical detail that’s not important right now.)

Relative merits of fixtures and factories

I tend to prefer factories because I like having my data generation right inside my test, close to where the test is happening. With fixtures the data setup is too distant from where the test happens.

In my experience, for whatever reason, most people who use RSpec use factories and most people who use Minitest use fixtures. If you’d like to learn more about factories and fixtures, I write more about it here.

Capybara

Some Rails tests only exercise Ruby code. Other tests actually open up a browser and simulate user clicks and keystrokes.

Simulating user input this way requires us to use some sort of tool to manipulate the browser. Capybara is a library that uses Ruby to wrap a driver (usually the Selenium driver), letting us simulate clicks and keystrokes using convenient Ruby methods.

For more examples of how to use Capybara, go here.

VCR and WebMock

One principle of testing is that tests should be deterministic, meaning they run the same way every time no matter what.

When an application’s behavior depends on external services (e.g. a third-party API like Stripe) it makes it harder to have deterministic tests. The tests can be made to fail by an internet connection failure or a temporary outage of the external service.

Tools like VCR and WebMock can help smooth out these challenges. VCR can let us run our tests against the real external service, but capture all the service’s responses in local files so that subsequent test runs don’t talk to the external service but rather just go off of the saved responses. That way, even if the internet connection fails or the service goes down, the tests still work.

WebMock is a tool that serves a similar purpose, although I usually use it in a more limited way. I don’t consider my test suite to be deterministic unless it doesn’t talk to the network at all, so I use WebMock to enforce that my test suite isn’t making any network requests.

Tools I don’t use

Cucumber is a somewhat popular tool when it comes to acceptance testing. It’s my view that Cucumber adds an extra layer of complexity and indirection without adding any value. Here are some details on why I don’t recommend Cucumber.

I also don’t use Shoulda matchers. Shoulda matchers make it easy and convenient to write certain kinds of tests, but the kinds of tests Shoulda helps you write are not a good kind of test to write in the first place. Shoulda helps you write tests that test your code’s implementation rather than its behavior. Here are more details on why I don’t recommend Shoulda.

Takeaways

Rails testing tools take some time to learn, but the important part (and perhaps more difficult part) is learning testing principles.

If you’re just getting started with Rails testing, the next step I would suggest is to learn about the different types of Rails tests and when to use them.

What are the different kinds of Rails tests and when should I use each?

When starting out with Rails testing, it’s hard to know where to start.

First, there’s the decision of which framework to use. Then, if you’ve chosen RSpec (which most people do), you’re presented with a bewildering set of possible test types to use.

In this post I’ll show you what types of tests there are. I’ll show you which ones you should use and which ones you can ignore. Since most commercial Rails projects use RSpec, I’m going to focus on the eight types of tests that the RSpec library offers. (Although if I were to use Minitest, my strategy regarding test types would be pretty much the same.)

The eight types of RSpec specs

The RSpec library offers a lot of different spec types.

  • Model specs
  • System specs/feature specs*
  • Request specs/controller specs*
  • Helper specs
  • View specs
  • Routing specs
  • Mailer specs
  • Job specs

There are two lines with asterisks. These are cases where the RSpec team decreed one spec type obsolete and replaced it with a new type. I’m only including those ones for completeness.

So the up-to-date list is really the following.

  • Model specs
  • System specs
  • Request specs
  • Helper specs
  • View specs
  • Routing specs
  • Mailer specs
  • Job specs

Here’s when I use each.

  • Model specs – always
  • System specs – always
  • Request specs – rarely
  • Helper specs – rarely
  • View specs – never
  • Routing specs – never
  • Mailer specs – never
  • Job specs – never

Let’s talk about each of these spec types in detail. I’ll explain why I use the ones I use and why I ignore the ones I ignore.

Spec types I always use

Believe it or not, the overwhelming majority of the Rails tests I write make use of just two of the eight different spec types offered by RSpec. You might think that this would leave large gaps in my test coverage but it doesn’t. My test coverage is consistently above 95%.

System specs

System specs are “high-level” tests that simulate a user’s keystrokes and mouse clicks. System specs literally open up a browser window (although perhaps an invisible browser window if the tests are run “headlessly”) and use certain tools to manipulate the browser to exercise your application through simulated user input.

The reason I find system specs so valuable is that they test my whole stack, not just a slice of it, and they test my application in the same exact way that a real user will be using it. System specs are the only type of test that give me confidence my whole application really works.

I write so many system specs that I’ve developed a repeatable formula for adding system specs to any new CRUD feature.

Model specs

Even though system specs are indispensable, they’re not without drawbacks. System specs are somewhat “heavy”. They’re often more work to write and more expensive to run than other types of tests. For this reason I like to cover my features with a small number of coarse-grained system specs and a comparatively large number of fine-grained model specs.

As the name implies, model specs are for testing models. I tend to only bring model specs into the picture once a model has reached a certain level of “maturity”. At the beginning of a model’s life, it might have all its needs covered by built-in Rails functionality and not need any methods of its own. Some people write tests for things like associations and validations but I don’t because I find those types of tests to be pointless.

I use model specs to test my models’ methods. When I do so, I tend to use a test-first approach and write a failing test before I add a new line of code so that I’m sure every bit of code in my model is covered by a test.

Spec types I rarely use

Request specs

Request specs are more or less a way to test controller actions in isolation. I tend not to use request specs much because in most cases they would be redundant to my system specs. If I have system specs covering all my features, then of course a broken controller would fail one or more of my tests, making tests specifically for my controllers unnecessary.

I also try to keep my controllers sufficiently simple as to not call for tests of their own.

There are just three scenarios in which I do use request specs. First: If I’m working on a legacy project with fat controllers, sometimes I’ll use request specs to help me harness and refactor all that controller code. Second: If I’m working on an API-only Rails app, then system specs are physically impossible and I drop down to request specs instead. Lastly, if it’s just too awkward or expensive to use a system spec in a certain case then I’ll use a request spec instead. I write more about my reasoning here.

Helper specs

The reason I rarely write helper specs is simple: I rarely write helpers.

Spec types I never use

View specs and routing specs

I find view specs and routing specs to be redundant to system specs. If something is wrong with one of my views or routes, it’s highly likely that one of my system specs will catch the problem.

Mailer specs and job specs

I don’t write mailer specs or job specs because I try very hard to make all my mailers and background jobs one-liners (or close). I don’t think mailers and background jobs should do things, I think they should only call things. This is because mailers and background jobs are mechanical devices, not code organization devices.

To test my mailers and background jobs, I put their code into a PORO model and write tests for that PORO.

Takeaways

RSpec offers a lot of different spec types but you can typically meet 98% of your needs with just system specs and model specs.

If you’re a total beginner, I’d suggest starting with system specs.

What level of test coverage should I shoot for?

“What level of test coverage should I shoot for?” is one of the questions most commonly asked by beginners to Rails testing.

My answer is that you shouldn’t shoot for a particular level of test coverage. I recommend that instead you make testing a habitual part of your development workflow. A healthy level of test coverage will flow from there.

I also want to address why people ask this question. I think people ask this because they want some way of knowing whether they’re testing “enough” or doing testing “right”. Test coverage is one way of measuring this but I think there are better, more meaningful ways.

I think that if you’re feeling the kinds of pains that missing tests leave in their absence, then you need more tests. If you’re not feeling those kinds of pains, then you’re good.

Pains that tell you your test coverage might be insufficient

Too many bugs

This is the obvious one. All software has bugs, but if you feel like the rate of new bugs appearing in production is unacceptably high, it may be a symptom of too little test coverage.

Too much manual testing

This is another fairly obvious one. The only alternative to using automated tests, aside from not testing at all, is to test manually.

Some level of manual testing is completely appropriate. Automated tests can never replace, for example, exploratory testing done by a human. But humans should only carry out the testing that can’t be done better by a computer. Otherwise testing is much more expensive and time-consuming than it needs to be.

Infrequent deployments

Infrequent deployments can arise as a symptom of too few tests for a couple different reasons.

One possible reason is that the need for manual testing bottlenecks the deployment timing. If it takes two days for manual testers to do a full regression test on the application, you can of course only deploy a fully-tested version of your application once every two days at maximum. (And this is assuming the test suite passes every time, which is not typically the case.)

Another possible reason for infrequent deployments is the following logic: things go wrong every time we deploy, therefore things will go wrong less often if we deploy less often, so let’s deploy less often. Unfortunately this decision means that problems pile up and get introduced to production all at once on each deployment instead of getting sprinkled lightly over time.

With the presence of a good test suite, deployments can happen many times a day instead of just once every few weeks or months.

Inability to refactor or make big changes

When a particular change has a small footprint, manual testing is usually good enough (although of course sometimes changes that seem like they’d have small footprints cause surprising regressions in distant areas).

When a change has a large footprint, like a Rails version upgrade or a broad refactoring, it’s basically impossible to gain sufficient confidence of the safety of the change without having a solid automated test suite. So on codebases without good test coverage, these types of improvements tend not to happen.

Poor code quality

As I’ve written elsewhere, it’s not possible to have clean, understandable code without having tests.

The reason is that refactoring is required in order to have good code and automated tests are required in order to do sufficient refactoring.

Diminished ability to hire and retain talent

Lastly, it can be hard to attract and retain high-quality developers if you lack tests and you’re suffering from the ailments that result from having poor test coverage.

If a job candidate asks detailed questions about your development practices or the state of your codebase, he or she might develop a negative perception of your organization relative to the other organizations where he or she is interviewing. All other things being equal, a sophisticated and experienced engineer is probably more likely to pick some other organization that does write tests over yours which doesn’t.

Even if you manage to get good people on your team, you might have trouble keeping them. It’s painful to live with all the consequences of not having tests. Your smartest people are likely to be the most sensitive to these pains, and they may well seek somewhere else to work where the development experience is more pleasant.

The takeaway

I don’t think test coverage is a particularly meaningful way to tell whether you’re testing enough. Instead, assess the degree to which you’re suffering from the above symptoms of not having enough tests. Your degree of suffering is probably proportionate to your need for more tests.

If you do this, then “good” coverage numbers are likely to follow. Last time I checked my main codebase at work my test coverage level was 96.47%.

Which test framework should I learn, RSpec or Minitest?

A common Rails testing question is which testing framework to use. RSpec and Minitest are the two that most people are deciding between. To many beginners it’s not clear which is the better choice.

We could weigh the technical pros and cons of each framework. Many people find things to love and hate about both RSpec and Minitest. You can find some passionate flame wars online if you look.

But before we get into all that, there are some realities to consider that overshadow the relative technical merits of the two frameworks. There are two particular facts we should think about.

Fact #1: usually, someone else decides for you

Most of us don’t have much choice as to whether to use RSpec or Minitest at work.

At some point we’ll get a job. At that job they’ll either use RSpec there or Minitest (or something else or nothing at all). Whatever they use at work, that’s what we’ll be using. Our personal preferences are moot.

Fact #2: usually, they’ve chosen RSpec

For better or worse, it’s my experience and the experience of most Rails developers I’ve talked with that most commercial projects use RSpec. (Note how I said most commerical projects. Most commercial projects use RSpec and most OSS Ruby projects, in my experience, use Minitest. I do not know why this is the way it is.)

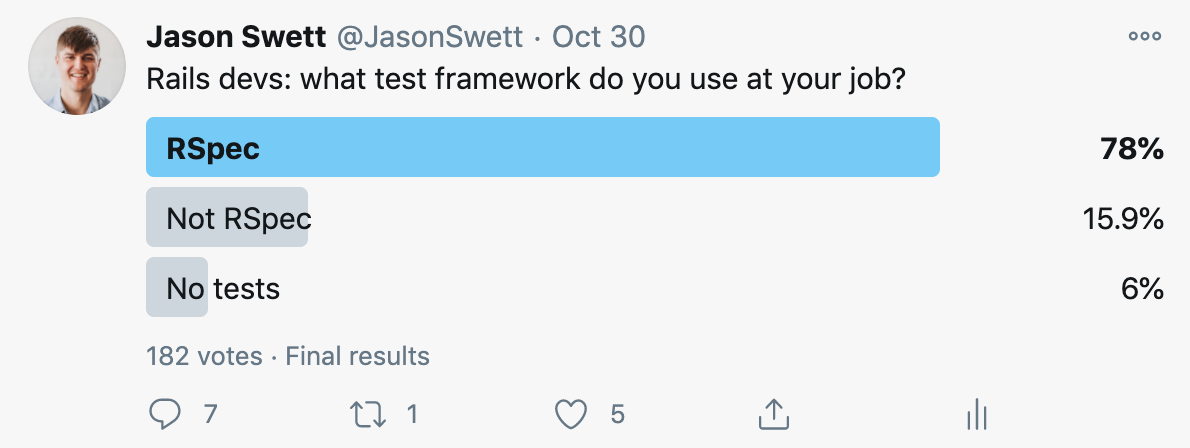
Out of curiosity I did a (totally unscientific) poll regarding which test framework they use at work. Take it with a grain of salt, but here are the results.

Even if my numbers are off by quite a bit, RSpec is still the more popular framework.

What does this mean?

My take is that this means if your goal is to get a Rails job, learning RSpec over Minitest will give you a higher probability that your skills match the tech stack that’s used at any particular company.

Some people may object to this way of looking at it. They might argue that if you always you go with whatever’s most popular instead of what’s the best technical choice, you may end up using a Windows laptop or switching from Rails to Node.js.

This argument is flawed though. We’re free to make our own choices on the big things but we can’t dictate what comes along with those choices. We can choose to use Rails instead of a different framework, but we can’t reasonably say that we’re only going to work on Rails projects that use, for example, Minitest and MySQL and Angular and no other combination of technologies. We have to compromise a little or face extremely limited job options.

Also, it doesn’t matter much

Having said all that, I actually don’t believe your choice of which test framework to learn matters!

RSpec and Minitest differ syntactically but they don’t really have meaningful conceptual differences. The principles of testing are the same regardless of which test framework you’re using, or even which language you’re using for that matter.

You’re very unlikely to become an expert in Minitest and then get turned down for a job because they use RSpec there, or vice versa. Employers typically realize that if someone is skilled with testing, they’ll be able to pick up any test framework relatively easily.

So try both

In a sense it might sound depressing that the answer to the RSpec/Minitest question is a) we don’t have a choice and b) it doesn’t matter anyway. I actually find these facts freeing.

If the choice between RSpec and Minitest doesn’t matter that much then we’re free to evaluate both according to our own independent judgment and taste and not worry about whether we’re making the “right” choice. Whatever we choose, we’re likely to develop skills that will apply to any job, whether they use Minitest or RSpec there.

So my advice is to try both frameworks and see which one you like better. Neither one is objectively superior to the other.

But if you just want me to pick for you, I say RSpec

My very simplistic logic is that RSpec is what you’ll most likely be forced to use at work, so that’s what you might as well learn.

But again, I encourage you to try both and decide for yourself. This is ultimately not a very important decision. Learning testing principles is much more important than learning testing frameworks.